 80mm Receipt Printer
 ACE H2 Receipt Printer
 RP337 Receipt Printer
 RP336S Dual-Color Receipt Printer
 RP350 Receipt Printer
 RP582 Receipt Printer
 RP581 Receipt Printer
 ACE G1Y Receipt Printer
 ACE G1YP Cloud Printer
 RP216 2'' Dual-color High-definition Label Printer
 ACE V1S 3'' Backless Label Printer
 RP310D 3'' Dual-color Label Printer
 RP410N 4'' Thermal Label Printer
 RP425 4'' Electronic Waybill Printer
 RP422 4'' Electronic Waybill Printer
 RP421A 4'' Electronic Waybill Printer
 RP420 4'' Electronic Waybill Printer
 RI463 Series Barcode Printers
 RP400A 4'' Thermal Transfer Tape Cutter Printer
 RP400H 4'' Thermal Transfer Tape Cutter Printer
 RPF413 300dpi RFID barcode label printer
 RPP02A Portable Receipt Printer
 RPP02B Thermal Portable Printer
 RPP02C Portable Receipt Printer
 RPP02D Thermal Portable Printer
 RPP04 4" Portable Label Printer
 RPP30 3" Portable Label Printer
 ACE M1 2" Portable Label Printer
 RPP320N 3" Portable Label Printer
 F82A A4 Front-Out Paper Tray Thermal Printer
 F81A Portable A4 Thermal Printer
 F81S Portable A4 Tattoo Printer
 Z1 Children's Educational Photo Printer
 R5 Mini Label Printer
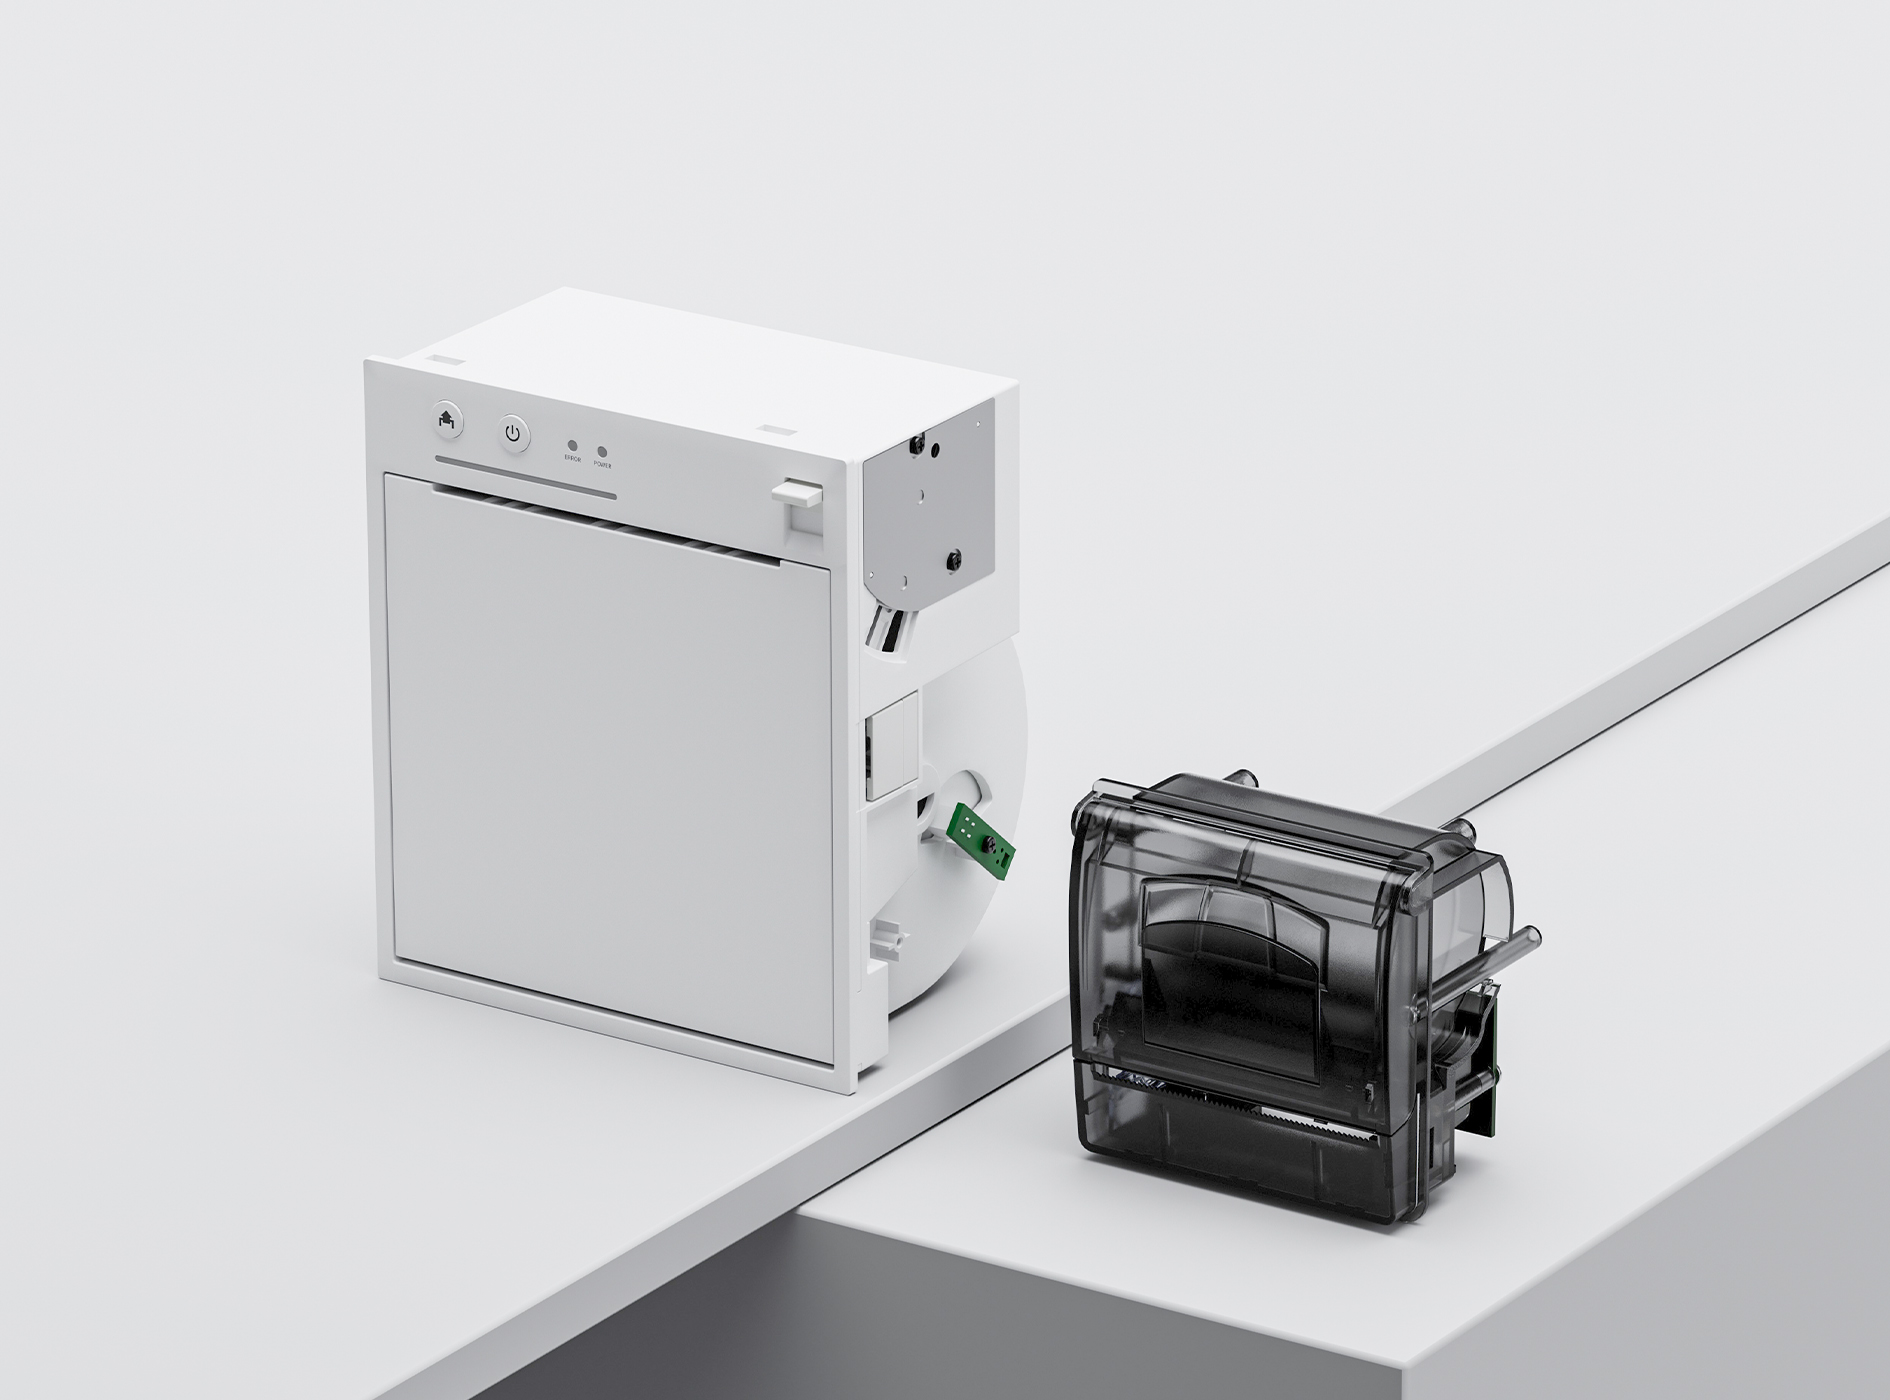
 RP07 58mm Embedded Printer
 RP203 58mm Embedded Printer
 PM315 Embedded Thermal Printer
 PM201 48mm Printing Module
 PM628 58mm printing module
 PM532A Printing Module
 PM532B printer module
 LS015/LS015A Barcode Scale
 RLS1815D/RLS1830D Barcode Scale
 RLS1815C/RLS1830C Barcode Scale
 AURORA S2L-S Labelless Scale
 AURORA E1 PRO-AI Cash Register Scale
 AURORA S2L-AI Label Scale
 DP01-AI Smart Tag Cashier Dual-Use Scale
 C3 Weighing Scale
 C1 weighing scale
 C11 Weighing Scale
 retail
 FOOD
FOOD Medical
 Mobile office/home
 asset Management
 logistics
 Driver download
 User Manual
 Tool Download
 Tag software
 Product Video
 Development Documentation
 Frequently Asked Questions
 User Guide
 Company News
 Exhibition Updates
 Industry Insights
 Product Update
 General situation
 Development history
 Honors and Qualifications
 R&D strength
 Team activities
 Social responsibility


RP400/RP500 Thermal Transfer Printer FAQ
RP400/RP500 Thermal Transfer Printer Frequently Asked Questions Guide
I. Basic Printer Operations:
1. Install the printer
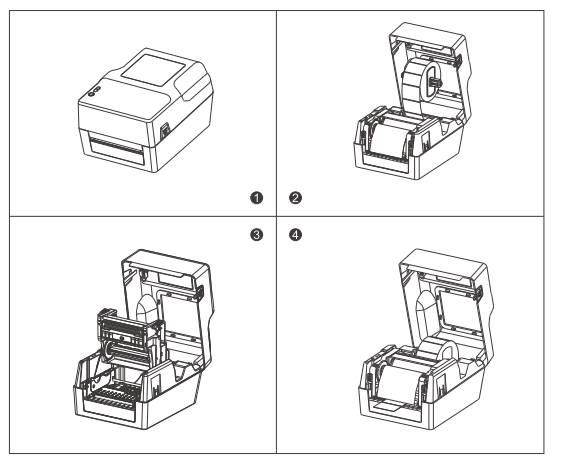
1.1 Instructions for Installing Printer Paper
- Paper roll installation:
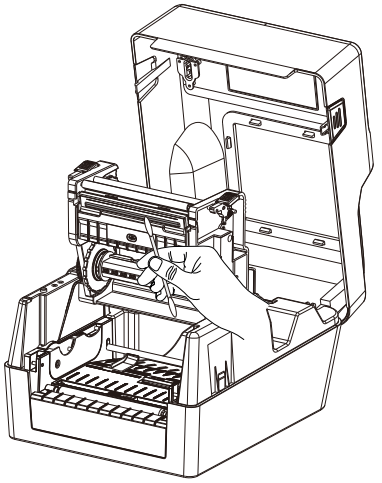
Press the switches on both sides of the top cover with both hands to open the printer top cover.
Load the paper roll into the label supply spool and secure it in the center using the paper roll retainer. (If using a 4" wide paper roll, you can remove the retainer and use the paper roll spool directly.)
Press the printhead switch to turn on the printhead. Pull out the front end of the paper (printing side up), pass it through the paper pressure shaft, paper width adjustment guide block, and photocoupler assembly, and adjust it to the appropriate position.
Close the printhead. Ensure the printhead is completely closed to guarantee print quality.
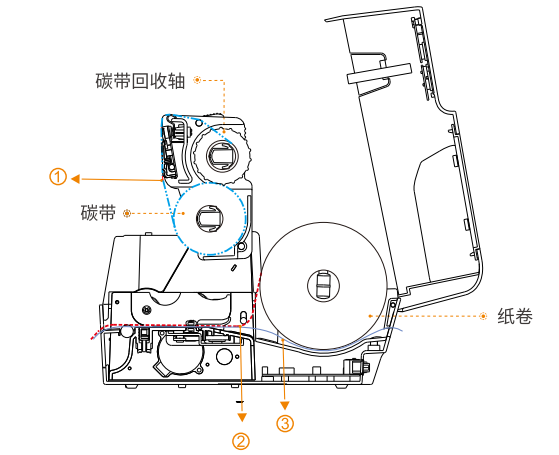
1.2 Carbon Belt Installation Instructions
① Carbon ribbon orientation
② Paper orientation (built-in)
③ Paper orientation (external type)
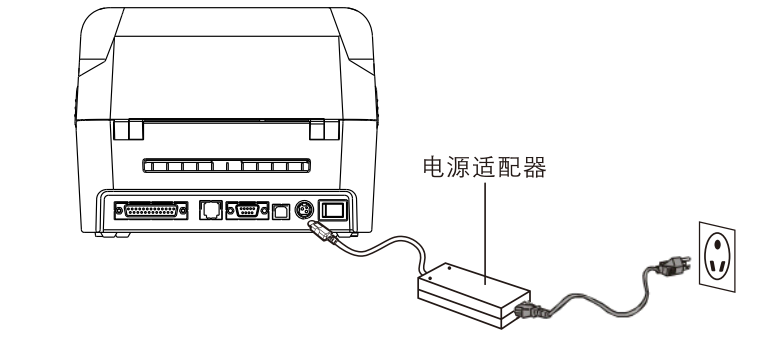
1.3 Connect the power supply and communication interface
- Power connection:
Make sure the printer power switch is in the off (O) position, connect the power adapter to the printer, connect the power cord to the power adapter, and connect the other end of the power cord to a nearby outlet.
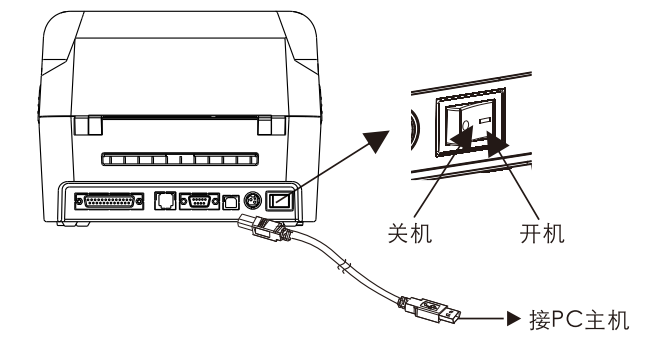
- Connect the USB cable:
Connect the USB cable to the printer, connect the USB cable to the PC host, and turn the printer power switch to the ON (I) position.
1.4 Button Description
- Paper feed:
When the printer is ready (LED is blue and fixed), press the button and the label will feed to the next sheet;
- Printing is paused:
While the printer is printing, pressing the FEED button once will pause printing. Simply press the button again.Printing resumed normally.
- Print the self-test page:
This function allows you to view the machine's internal parameter values ??after the printer is powered on, providing access to the machine's settings.And to determine whether the machine is functioning properly.
① Please confirm that the label paper has been installed properly.
② Turn off the printer power.
③ Press and hold the paper feed button while turning on the printer.
④ Release the paper feed button when the printer is feeding paper and printing content.
⑤ The printed content is the self-test page template.
- Tag learning:
Press and hold the paper feed button until you hear the machine beep twice, then release the button to automatically perform paper learning and calibration.
- Printer initialization:
The printer initialization function clears the downloaded files in the memory (DRAM) and initializes the printer parameters.Restore factory settings. Please follow these steps to initialize the function:
① Turn off the power.
② Open the print head cover, press and hold the FEED button on the printer, then turn on the printer power and hold the FEED button for 10 seconds.
③ When all the printer indicator lights are off, release the FEED button. The printer will then restart.Initialization is complete.
2. Tool Setup Instructions
2.1 Tool Settings Function
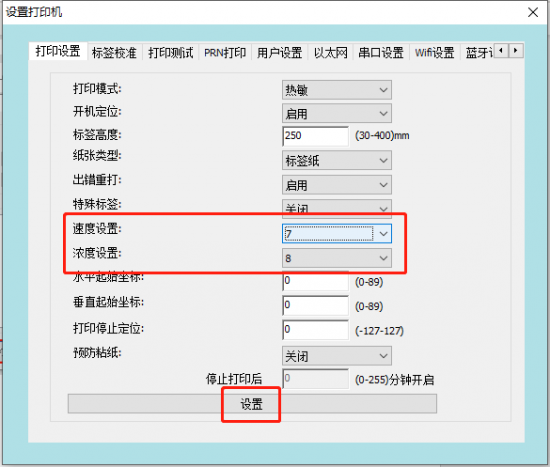
- Concentration/Speed ??Settings:
Printer density refers to the different density effects that a printer can achieve by changing the heating time of the print head. Customers can change the print density within the selectable range according to their printing needs.
Printer speed refers to the speed at which the printer outputs paper, which is adjusted by controlling the rotation speed of the stepper motor. Customers can adjust the printing speed within an optional range according to their printing needs.
- How to set concentration/speed using the label tool:
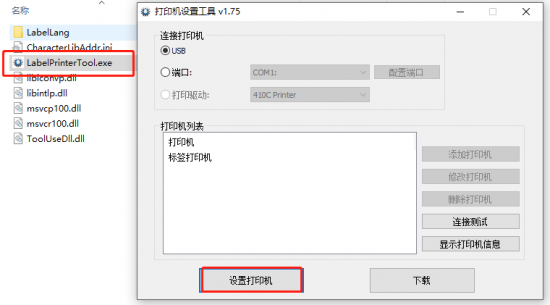
Open the label settings tool and select "Set up printer";
Switch to the "Print Settings" interface, select the desired speed and density from the drop-down menus in the Speed ??Settings/Density Settings options, and then click the "Settings" item at the bottom of the interface. If a message "Settings successful" or a printer beep indicates that the settings have been changed successfully;
- Tag learning:
Note: The AD value of the backing paper of different labels is not the same as the pressure difference between the AD value of the paper. Therefore, when replacing label paper of different specifications, label learning is required. Label learning is divided into manual label learning and tool label learning (the effect is the same).
- Manual tag learning method:
The printer is ready. Press and hold the power button for 2 seconds (
- Learning with tags using tagging tools:
Open the label settings tool and select "Set up printer";
Switch to the "Label Calibration" interface, select automatic label learning, and click "Learn". The label paper will automatically feed and verify the position. When the label paper stops at the tear position, it means that the label learning is successful.

- Learning without paper:
Paper Out Learning: Its main function is to store the AD value when there is a paper out condition in the printer's FLASH memory, so that the printer can correctly identify the AD value when there is a paper out condition. If the AD value when there is a paper out condition is lost, the printer may make two error alarms.
- Using labeling tools to learn methods when paper is scarce:
The printer needs to have the paper removed and the top cover closed, and the printer kept powered on.
Open the label settings tool and select "Set up printer";
Switch to the "Label Calibration" interface, select "Paper Out Learning", and click "Learn". The printer will then beep 3 times to indicate a paper out issue.
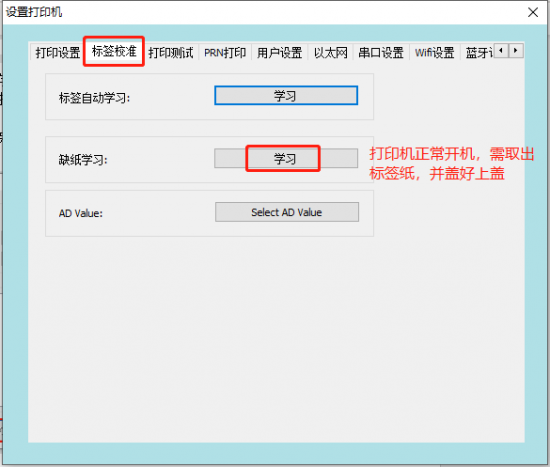
After the paper shortage learning is completed, automatic label learning is also required. For details, please refer to the label learning method.
- Command switching (if supported):
Note: Under normal circumstances, Rongda's label printers support both label and ESC/POS instruction modes. When the printer needs to print thermal receipts, it can switch to ESC/POS mode for printing. When the printer needs to use labels, it can switch to label instruction mode.
- Use the label tool to set the instruction type:
Open the label settings tool and select "Set up printer";
Switch to the "User Settings" interface, select "Label Instruction" or "ESC/POS Instruction" in the second line of instruction types, and then click "Settings";
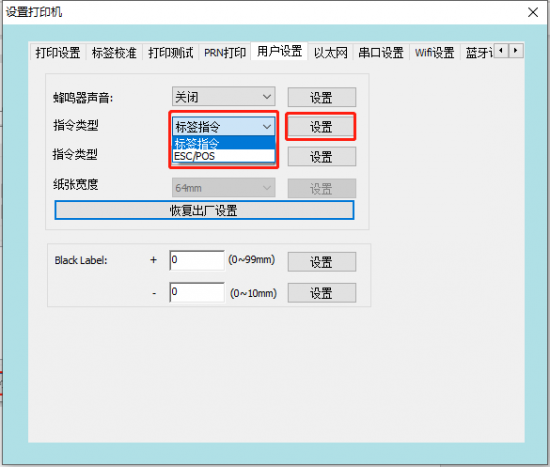
Note: In the instruction type options in the third row, the different label instruction selections only apply to custom types, so this item does not need to be set;
When the ESC/POS command is set, the paper width can be adjusted to different thermal paper printing widths;
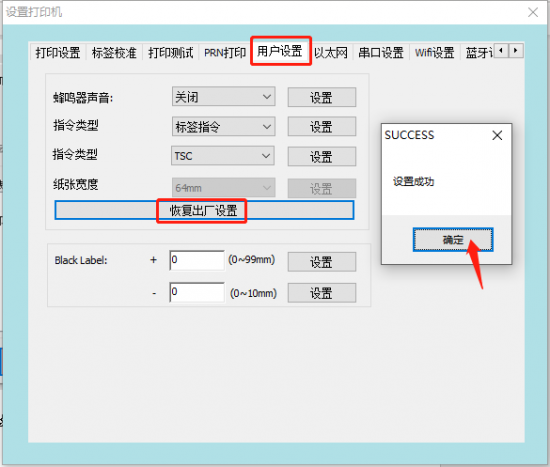
- Restore factory settings:
Note: The printer firmware is fixed at the factory with settings such as density, speed, command mode, IP address (192.168.1.87), and default Chinese characters. Sometimes, restoring the printer to factory settings can help quickly resolve issues.
- Restore label tool to factory settings:
Open the label settings tool and select "Set up printer".
Switch to the "User Settings" interface, click "Restore Factory Settings", a success message will pop up, click "OK";
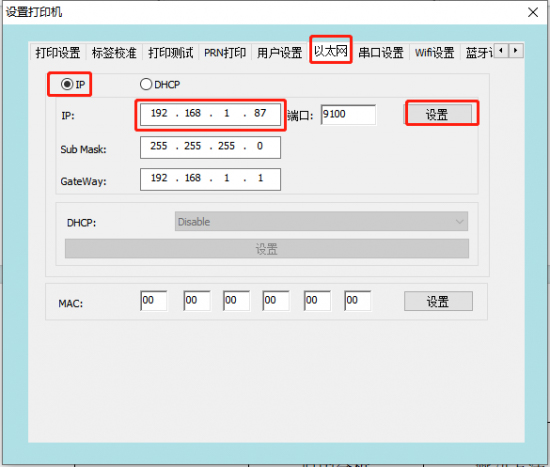
- Configure the network port IP:
Note: When printing via a local area network port, you need to configure the IP address of each printer first, ensuring that the printer's IP address and the host's IP address are on the same gateway:
Use a tagging tool to modify IP addresses.
Connect the printer to the USB cable, open the label setup tool, and click "Set up printer".
Switch to the "Ethernet" settings interface, enter the new printer IP address, and click "Settings".
2.2 Tool Download Function
- Firmware upgrade:
Note: The printer requires internal software firmware to function properly. Rongda will adjust the printer firmware according to the printer's operation. Sometimes, certain program bugs of customers need to be resolved, which requires firmware upgrades.
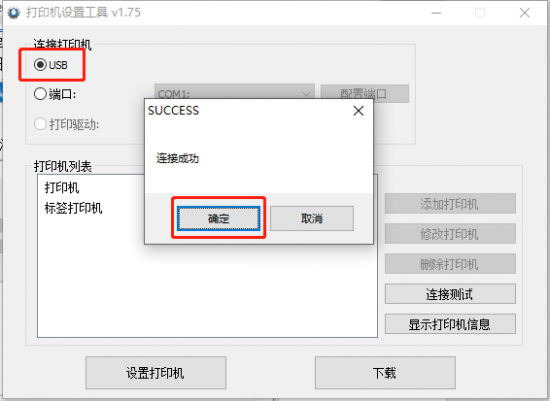
How to upgrade firmware using a tag tool:
Connect the printer power cord, connect the USB cable to the computer, and turn on the printer.
Open the tag settings tool, click connection test, and a message will indicate that the connection was successful.
Click "Download" to switch to the "Program" download page;
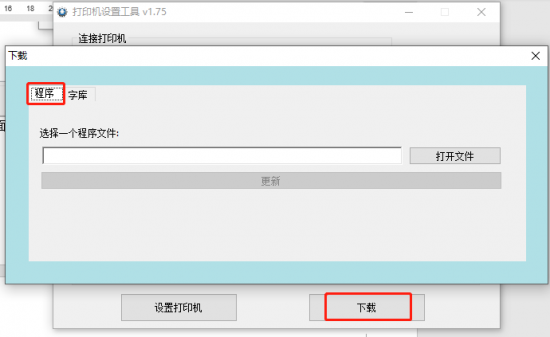
④ Click to open the file, select the firmware provided by the manufacturer, double-click the printer firmware to open it;
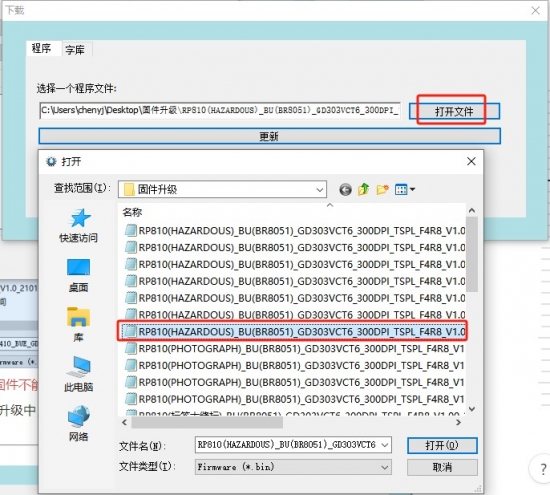
Note: Firmware versions for different hardware cannot be upgraded arbitrarily. Before upgrading the firmware, please confirm whether the current printer firmware version is applicable.
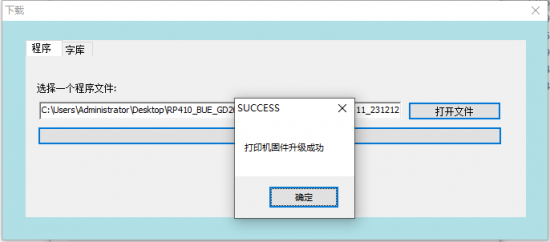
Clicking "Update" will display the message "Printer is upgrading, please do not power off or operate the printer." At this time, you must wait patiently for the printer to upgrade automatically and must not perform any operations.
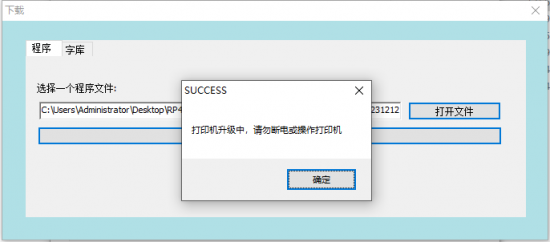
After approximately 15 seconds, the printer will automatically restart and display a message indicating "Printer firmware update successful" after a successful update.
- Font update:
Note: The font library is a preset font library file stored in the printer's internal FLASH memory, used by the printer to call the font library when printing instructions;
How to update the font library using the tag tool:
Connect the printer power cord, connect the USB cable to the computer, and turn on the printer.
Open the tag settings tool, click connection test, and a message will indicate that the connection was successful.
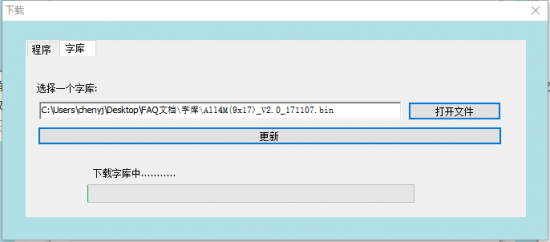
Click "Download" to switch to the "Fonts" download page;
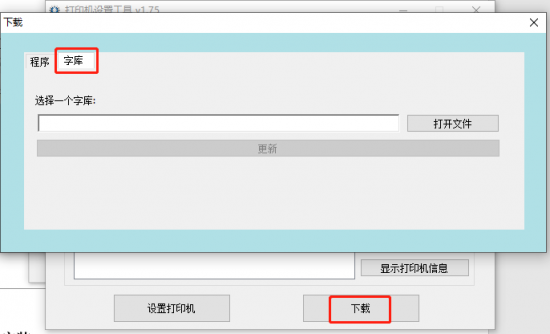
Click to open the file, select the font file provided by the manufacturer, double-click the printer font file to open it;
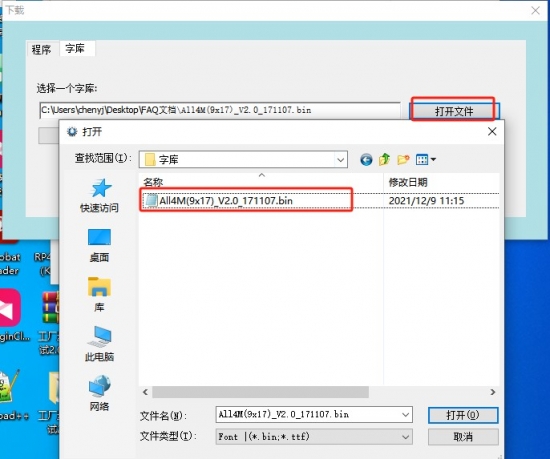
Click Update, and enter the corresponding font address number provided by the manufacturer in the address box (the standard font address is 0 by default).
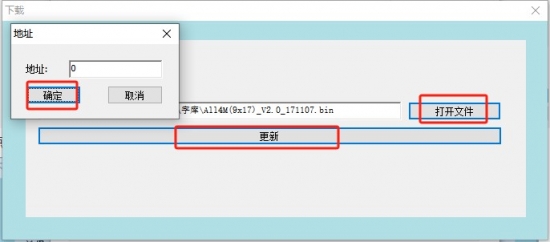
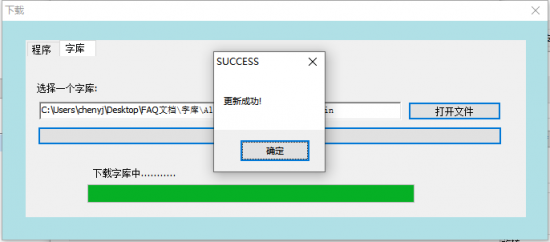
After confirming, start the font download (wait for the green transfer bar to reach the far right). After the font is updated, you usually need to turn the printer off and on again for it to take effect.
3. Driver Installation Instructions
3.1 Windows Driver Installation Steps
-
Note: Printer drivers are software programs on a computer that make it easier for customers to edit images and transfer print data. Therefore, many customers need to install drivers to print.
Driver download:
Driver download→Download link;
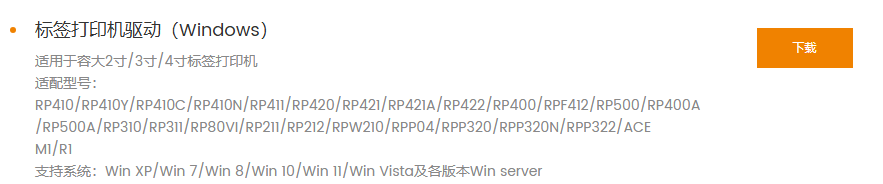
The following example is based on the Windows 10 operating system. It is recommended to disable any security software before installation to avoid interfering with driver installation. The driver is an integrated driver and will automatically install the one that matches the printer's command language.
Driver installation steps: Simply double-click the driver program to install.
Before installing the driver, please ensure that the power supply is connected and the USB cable is connected to the computer. The following illustrations may vary depending on your computer's operating system.
-
3.2 Driver Setting Function
Note: Customers can adjust the driver parameters and paper size according to their actual needs. Taking Windows 10 as an example, the following are the steps to adjust the driver settings.
-
Steps to print driver test page:
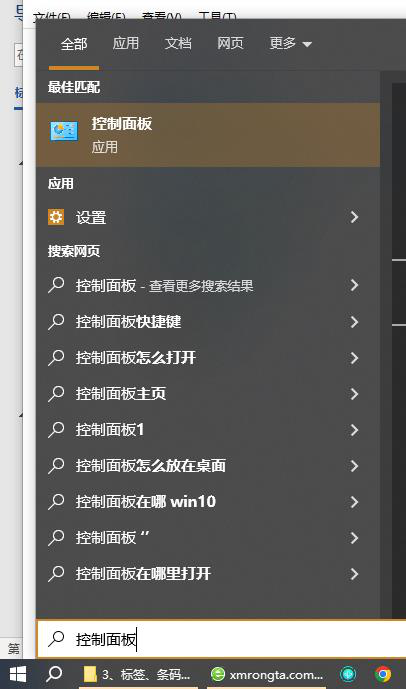
- Open the Control Panel by entering "Control Panel" or "control panel" in the search box in the lower left corner to access the Control Panel interface;
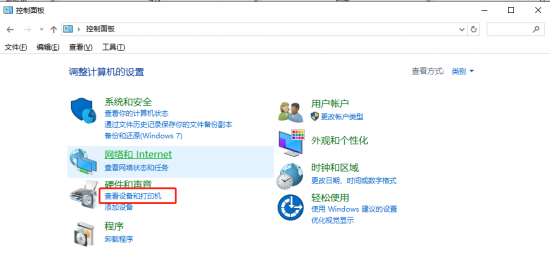
- In the Control Panel interface, select and double-click the View Devices and Printers icon.
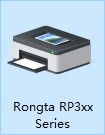
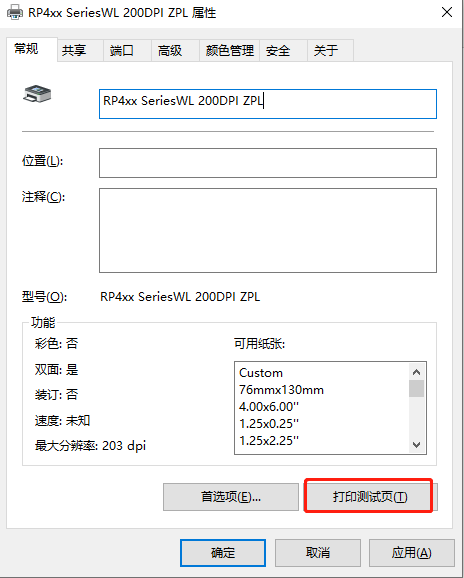
- Locate the icon of the installed driver. The following example uses the (RP4xx SeriesWL 200DPI ZPL) driver. Right-click and select Printer Properties.
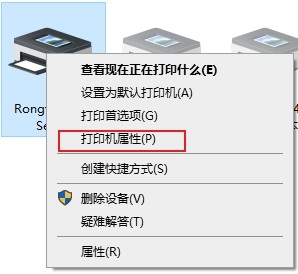
- If you click the print test page function and the printer prints the test page successfully, it means that the driver port settings are correct, and the printer driver can print normally at this time.
- Open the Control Panel by entering "Control Panel" or "control panel" in the search box in the lower left corner to access the Control Panel interface;
-
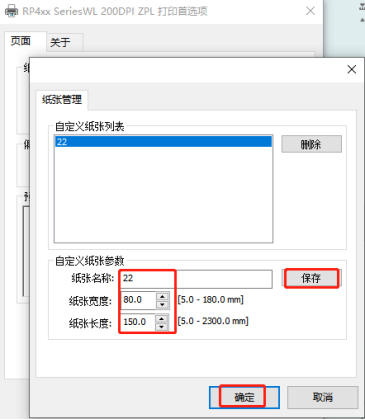
Driver settings for label size:


Right-click on the printer icon to open "Printer Properties," then click "Advanced," then "Print Defaults," and select the corresponding paper size in "Paper Name."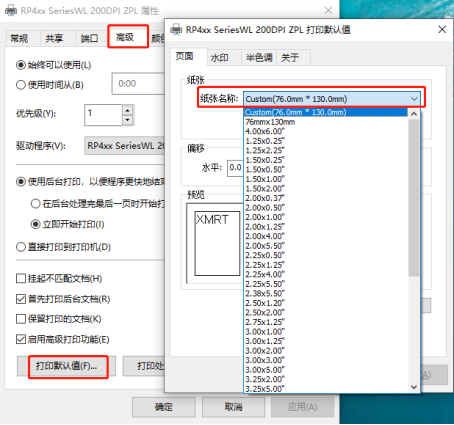
If the required size is not available, open [Paper Management], create a new paper size, save it, and then select the new paper size in [Paper Name].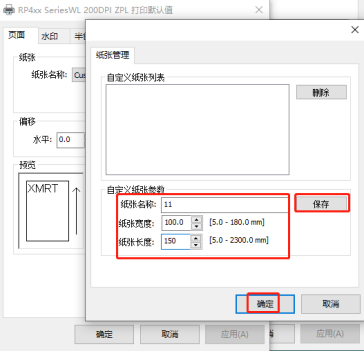
Set the same paper size in the "General" interface.;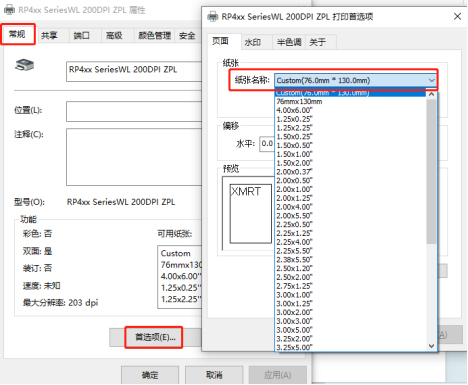
If the required size is not available, open [Paper Management], create a new paper size, save it, and then select the new paper size in [Paper Name].
II. Common Problems and Solutions:
1. Driver cannot be installed.
- Does the printer require a USB cable to be connected during driver installation? The printer needs to be connected via USB cable to install the driver properly. Please check if the printer's USB cable is properly connected and if the printer is in standby mode.
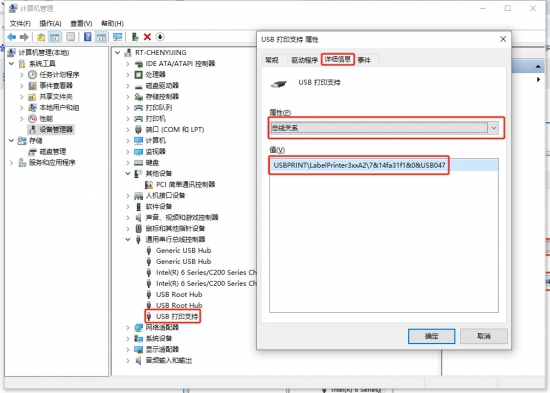
- To check if the driver installation file is faulty: First, print a test page or check the USB printing support in Device Manager to verify the USB HID information, thus confirming whether the driver is compatible with the printer.
- Driver icon cannot be displayed
- Due to Windows system upgrades, some driver files have not been certified by Microsoft. Therefore, after installation, the driver icon may not appear quickly in the printer list. Restarting your computer can resolve this issue.
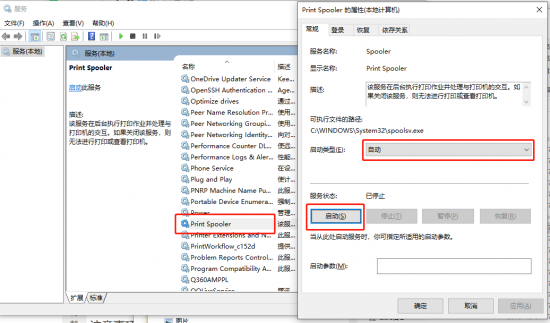
- Check if the print spool service is enabled:
- For other driver installation issues, please contact our after-sales technical support hotline for assistance: 400-800-0596.


2. Paper feed error during printing
- Printing blank pages or inaccurate paper feed position
- Check if the buttons can feed paper normally, then proceed.Tag learningoperate
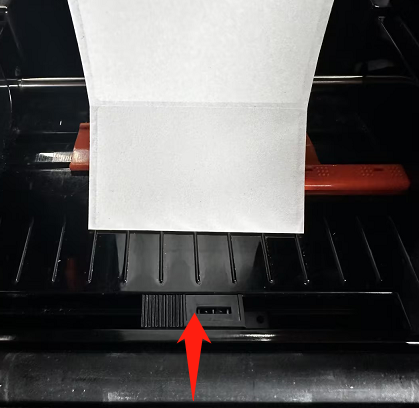
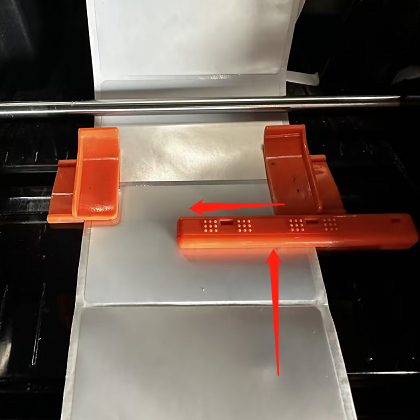
- Check if the optocoupler is in the correct position.
- The Rongda RP4XX series optical coupler slider is designed to slide. When printing labels, the optical coupler slider needs to be moved to the position directly below the center of the paper, as shown in the figure below.
- Paper not feeding/paper sticking problem
- If the printer fails to feed paper, first test if printing a test page is normal.
- Check if the printer cover is properly closed/if the rubber roller bushing has come loose;
Schematic diagram of rubber roller bushing 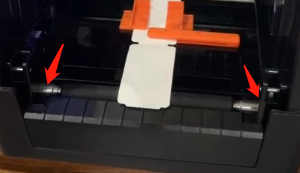
- Adjust the density and speed using the tool, then print a test print;
- Adjust the density and speed by driving the printer, then print a test print.
- If the above solutions do not resolve the issue, please contact customer service for assistance.
3. Printing garbled characters issue
- Paper output is normal, but garbled characters appear in the Chinese text section.
- The requirement is to provide a self-test page to confirm whether the character set is correct.
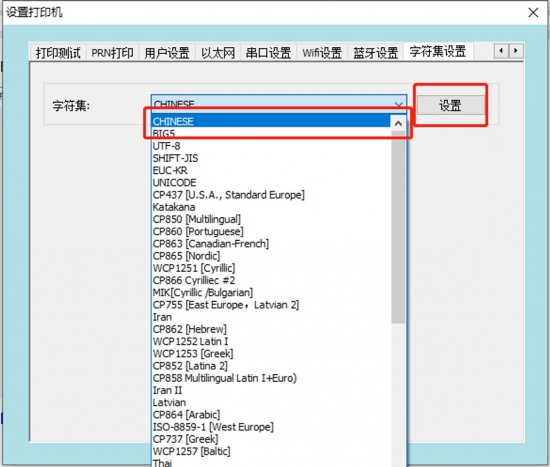
- Change the printer language to Chinese;
- Connect the printer to the USB cable, open the label setup tool, and click "Set up printer".
- Switch to the character set settings interface, select CHINESE from the character set drop-down menu, and click "Settings".
- Connect the printer to the USB cable, open the label setup tool, and click "Set up printer".
- We need to capture the printed data to confirm if the issue is with the data displayed at the bottom of the app.
- You need to provide a test app and related accounts to simulate customer anomalies and then analyze them.
- The paper keeps printing out and displaying unusual English characters.
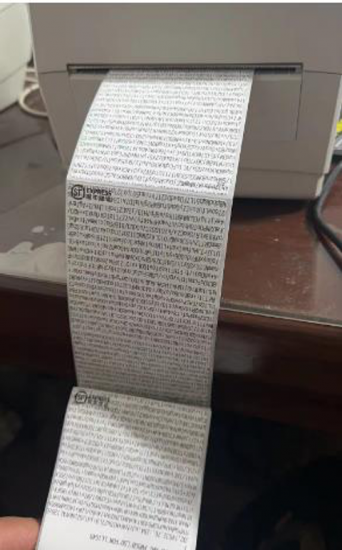
- Command mode error
- Print the self-test page to confirm that the command mode is ESC/POS.
- Switch command mode to switch printer mode to label mode.
- A small amount of garbled characters and misalignment appeared in the middle of the printed document.
- Check if the printer's connection cable is loose; unplug and replug the data cable or replace it with a new one.
- Command mode error
- 4. Printing blurriness error


- blurry print
This may be due to a mismatch between the ribbon material and the corresponding paper type.
- Print density too high or too low / speed setting incorrect
Use the settings tool or the software to readjust the printer's print density and print speed. In the settings tool, adjust the density to coarse adjustment. In the driver, adjust the density to fine adjustment.
6. Printer indicator light shows an error.

7. The printer cannot be turned on.
- Power not connected
Check if the power is connected.
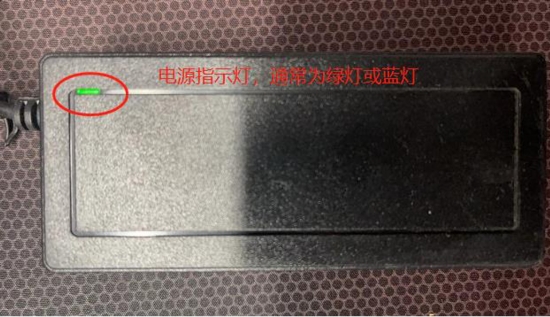
- The adapter is not working or is incompatible.
- Check if the adapter indicator light is working (the indicator light should be green or blue);
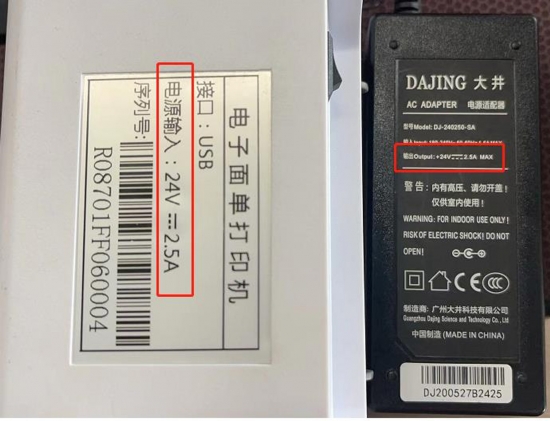
- Check if the printer adapter specifications match the printer by looking at the power input specifications on the bottom label of the printer and the DC output specifications (24.0V === 2.5A) on the back of the adapter.
- Check if the adapter indicator light is working (the indicator light should be green or blue);
- printer malfunction contactRongda After-sales ServiceReport a repair


III. Daily cleaning and maintenance:
1. Printer head cleaning and maintenance:
-
Clean the sensor. The print head should be cleaned if the printer exhibits any of the following conditions:
- blurry and unclear printing
- The printed page has a blurry vertical column.
- Loud paper output noise
- The printer prints black ink with severe carbon buildup.
-
The printhead cleaning steps are as follows:
- Turn off the printer, open the top cover, and remove any paper if present. If printing has just finished, wait for the print head to cool completely.
- Wipe away dust and stains from the printhead surface with a soft cotton cloth dampened with alcohol. After the alcohol has completely evaporated, close the top cover and test print again.
2. Clean the sensor
- The paper out sensor should be cleaned if the printer exhibits any of the following symptoms:
- Paper recognition error;
- The paper is not properly positioned;
- No alarm sounds when paper is out of stock;
- Skip the blank paper, move the paper more;
- Newspapers are out of print;
- Unable to learn how to use paper correctly;
- The paper feed is misaligned;
- The paper shortage sensor cleaning steps are as follows:
- Turn off the printer, open the top cover, and remove any paper if present.
- Use a soft cotton cloth dampened with neutral alcohol to wipe away dust and dirt from the sensor surface, as shown in the picture above.
- After the alcohol has completely evaporated, close the top cover and test the machine again.
3. Clean the printer's roller assembly.
-
The printer rollers should be cleaned if any of the following conditions occur.
- blurry and unclear printing
- The printed page has a blurry vertical column.
- Loud paper output noise
- The printer prints black ink with severe carbon buildup.
-
The steps for cleaning the printer rollers are as follows:
- Turn off the printer and open the top cover.
- Use a soft cotton cloth dampened with neutral alcohol to wipe away dust and stains from the printer roller surface.
- After the alcohol has completely evaporated, close the lid.
IV. Precautions:
- Always ensure the printer is powered off during routine maintenance.
- Do not touch the printhead surface with your hands or metal objects. Do not use tweezers or other tools to scratch the printhead, printing roller, or sensor group optocoupler.
- Organic solvents such as gasoline and acetone must not be used.
- Wait until the alcohol has completely evaporated before turning on the power to continue printing.
- The paper shredder blade has sharp edges; please be careful not to touch it to avoid cuts.
- The printhead is a heating element. Do not touch the printhead or surrounding parts during or immediately after printing. Children must use the device under adult supervision.
- Warning: Do not touch the surface of the thermal printhead or the connectors to avoid static electricity damaging the printhead.
- Warning: Operating this device in a residential environment may cause radio interference.
V. After-sales contact information:
1.400 Technical Support:
Hotline: 400-800-0596. After dialing 400, press dial 2 for label printer service support.
Working hours: 9:00 AM - 8:30 PM (6:00 PM on weekends and public holidays)
2. After-sales repair method:
Recipient: After-sales Service Department Telephone: 15359340780
Address: Rongda Science and Technology Park, No. 88 Tonghui South Road, Tongan Industrial Concentration Zone, Xiamen City, Fujian Province
Return Repair Instructions: When returning the device for repair, please include the return address, contact information, a list of all items packed in the box, and a detailed description of the malfunction in the package. This will help improve the efficiency of the return process. Thank you for your support! If no information is provided, the device will be returned according to the sender's information.