 80mm Receipt Printer
 ACE H2 Receipt Printer
 RP337 Receipt Printer
 RP336S Dual-Color Receipt Printer
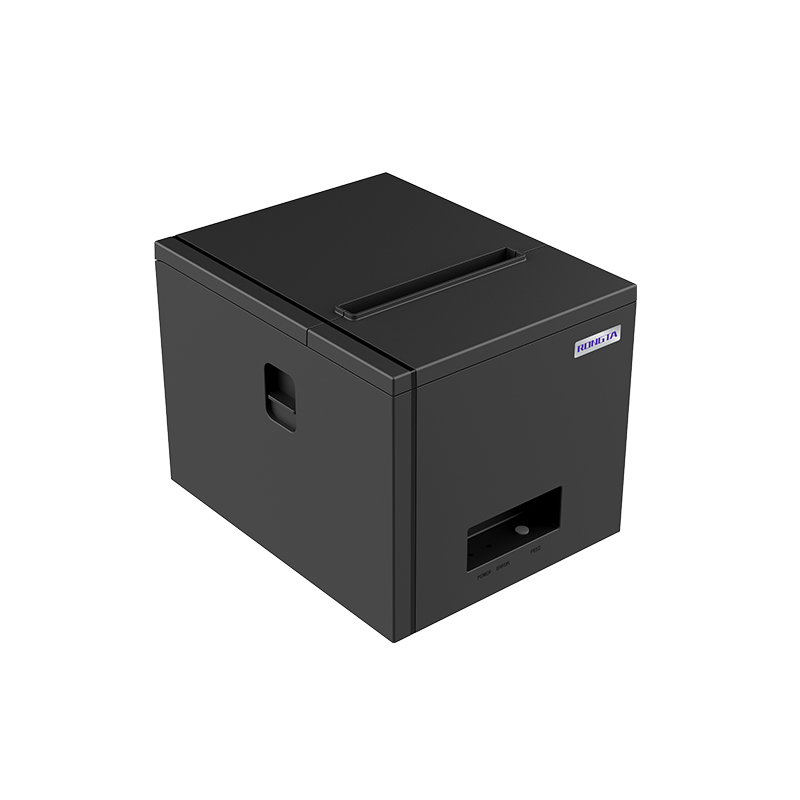 RP350 Receipt Printer
 RP582 Receipt Printer
 RP581 Receipt Printer
 ACE G1Y Receipt Printer
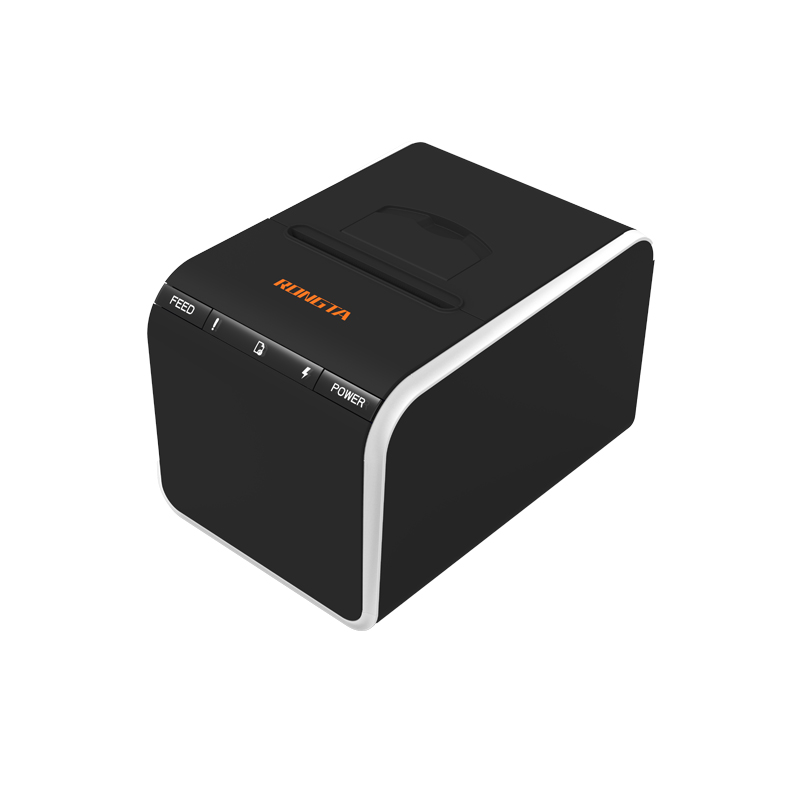 ACE G1YP Cloud Printer
 RP216 2'' Dual-color High-definition Label Printer
 ACE V1S 3'' Backless Label Printer
 RP310D 3'' Dual-color Label Printer
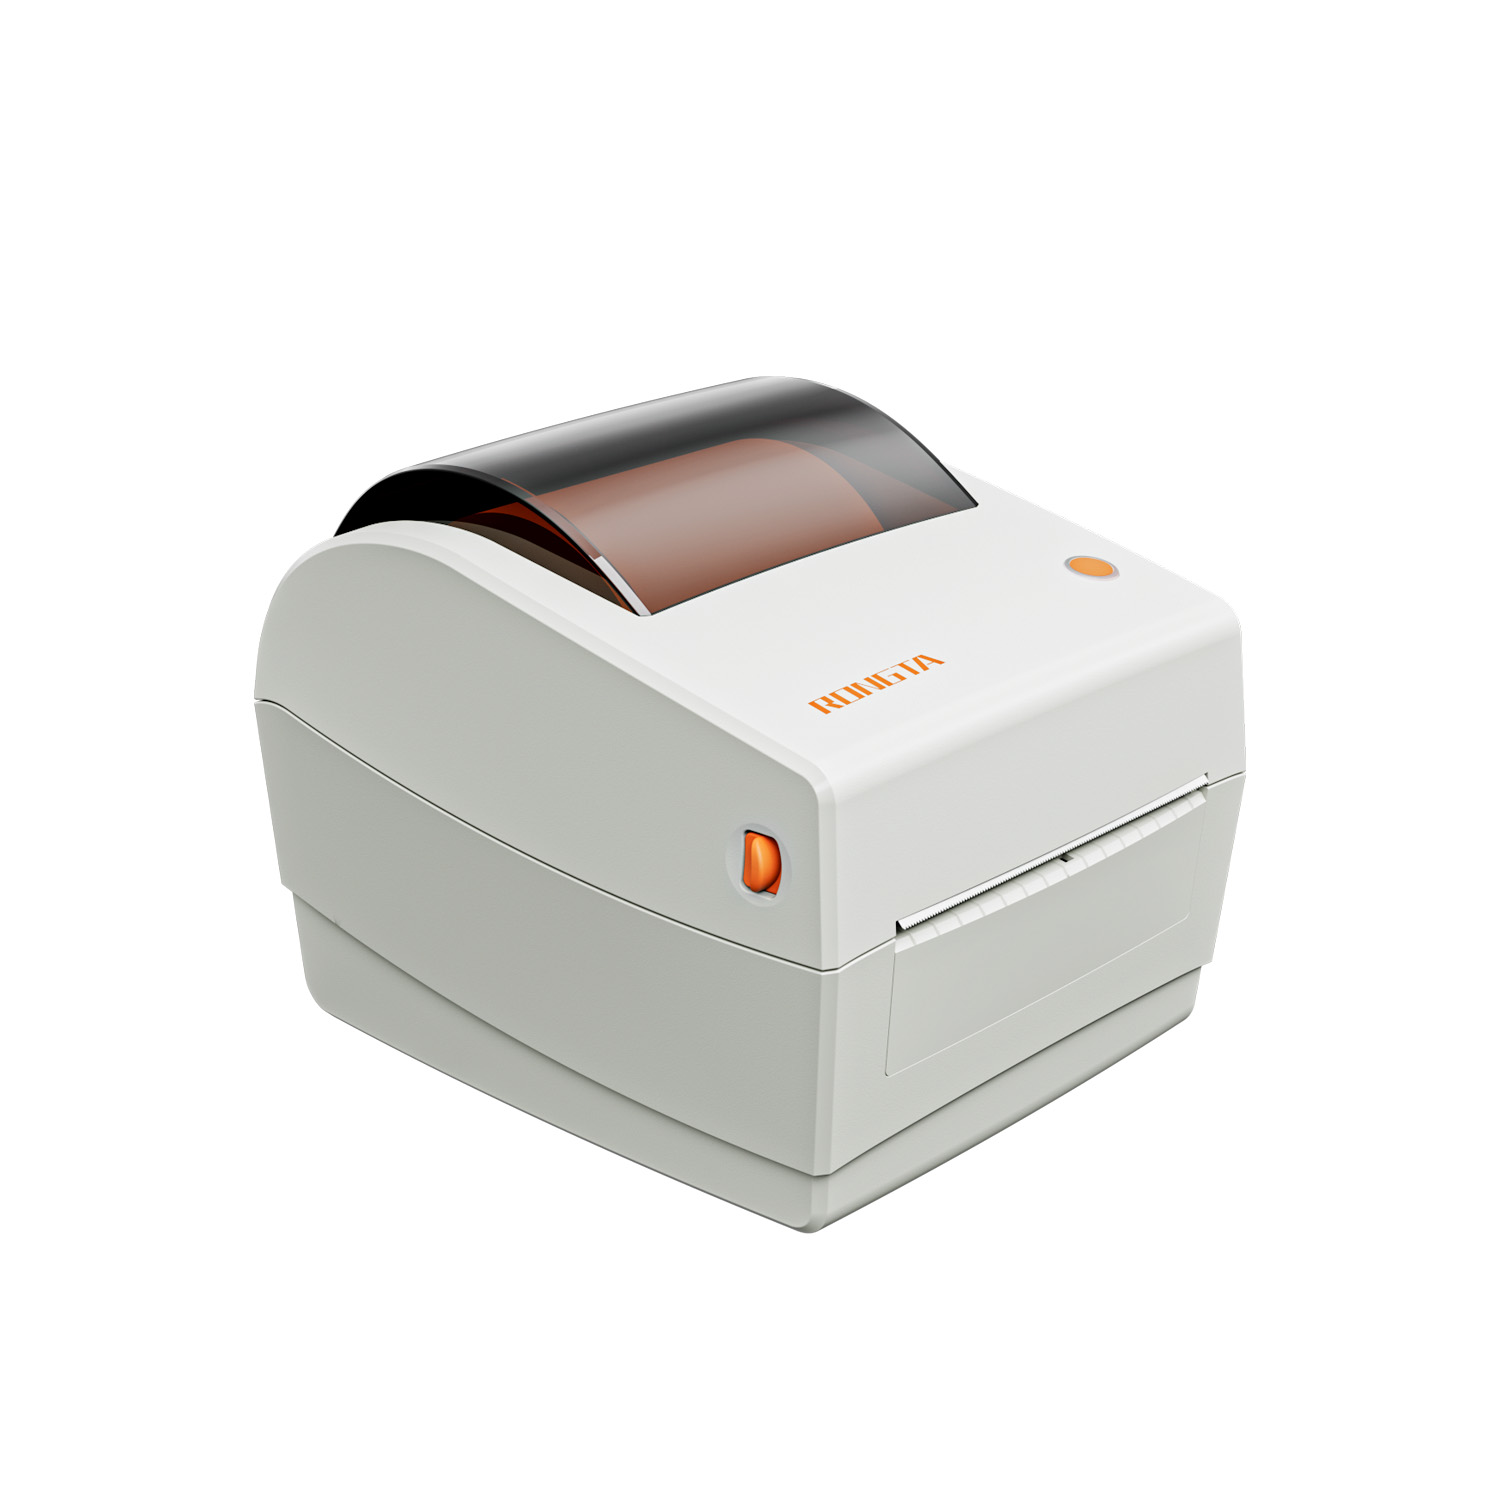 RP410N 4'' Thermal Label Printer
 RP425 4'' Electronic Waybill Printer
 RP422 4'' Electronic Waybill Printer
 RP421A 4'' Electronic Waybill Printer
 RP420 4'' Electronic Waybill Printer
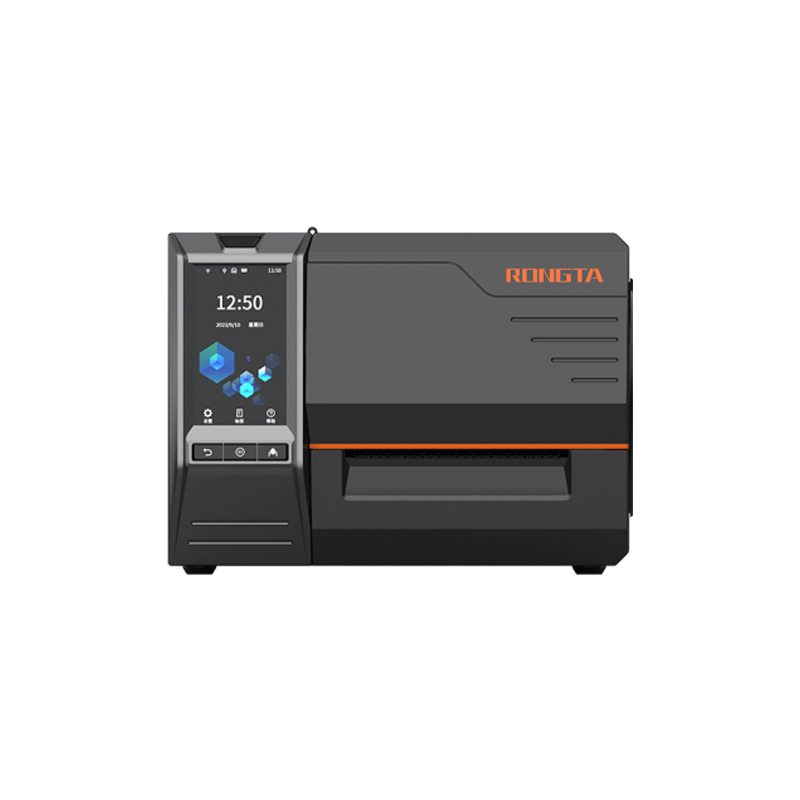 RI463 Series Barcode Printers
 RP400A 4'' Thermal Transfer Tape Cutter Printer
 RP400H 4'' Thermal Transfer Tape Cutter Printer
 RPF413 300dpi RFID barcode label printer
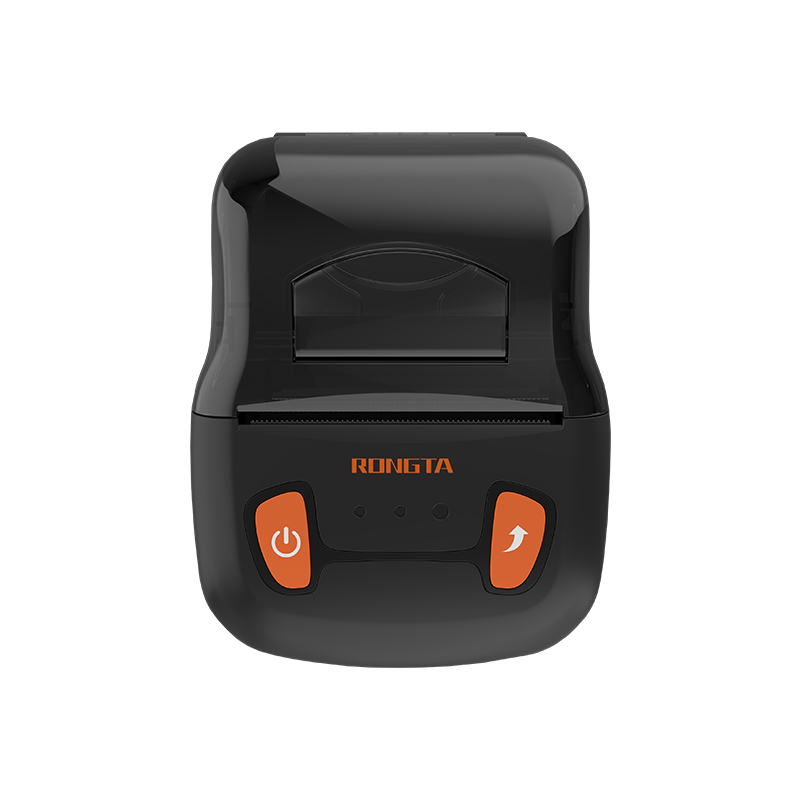 RPP02A Portable Receipt Printer
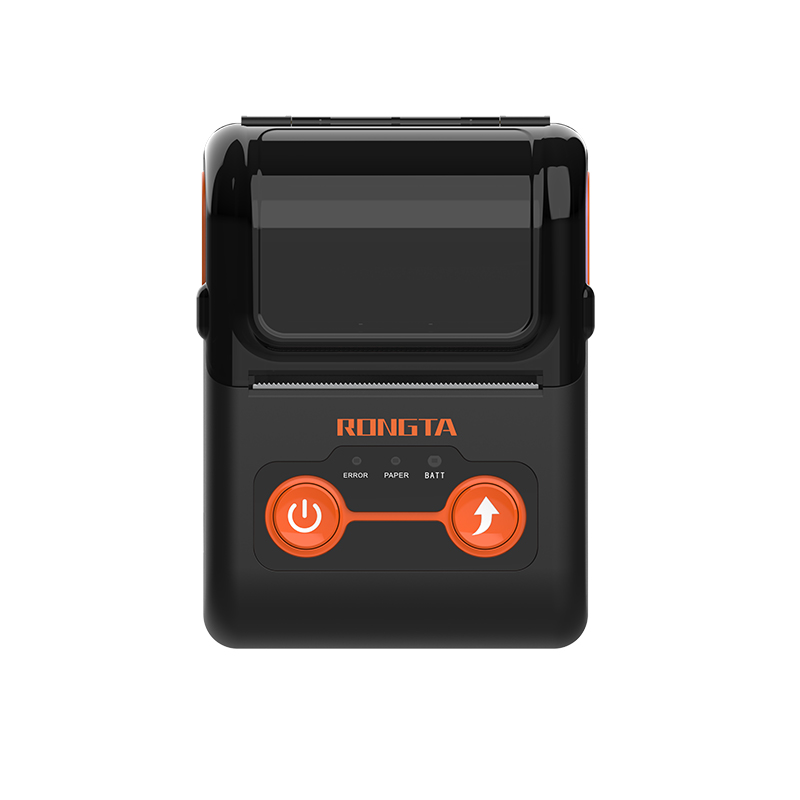 RPP02B Thermal Portable Printer
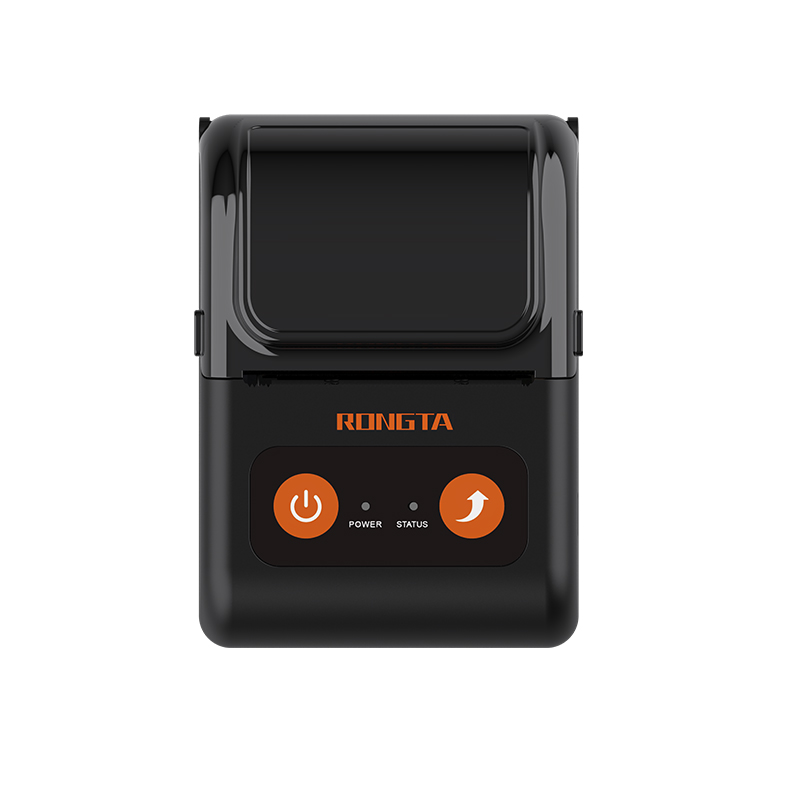 RPP02C Portable Receipt Printer
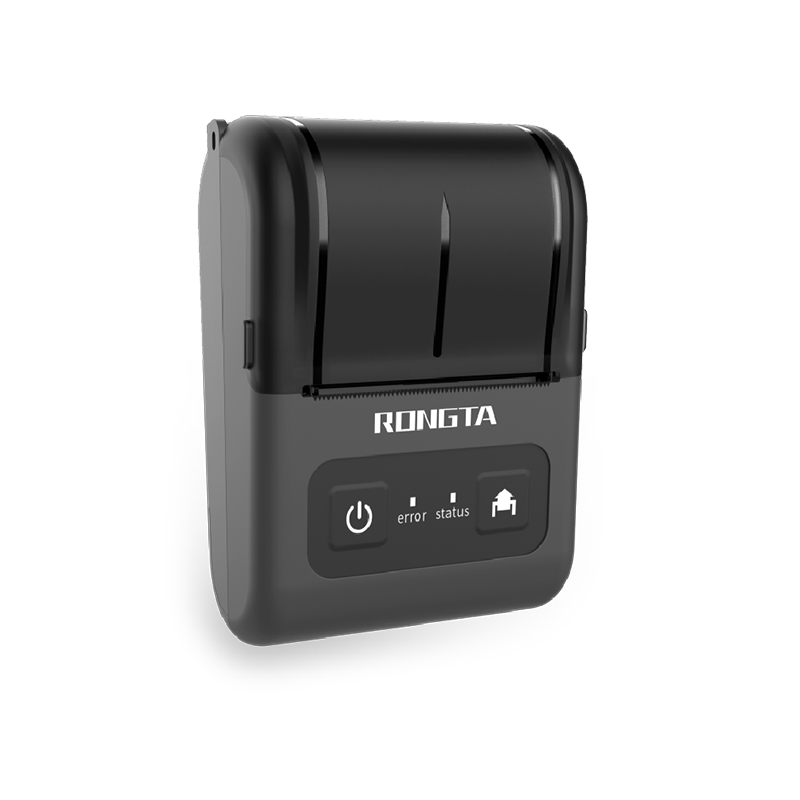 RPP02D Thermal Portable Printer
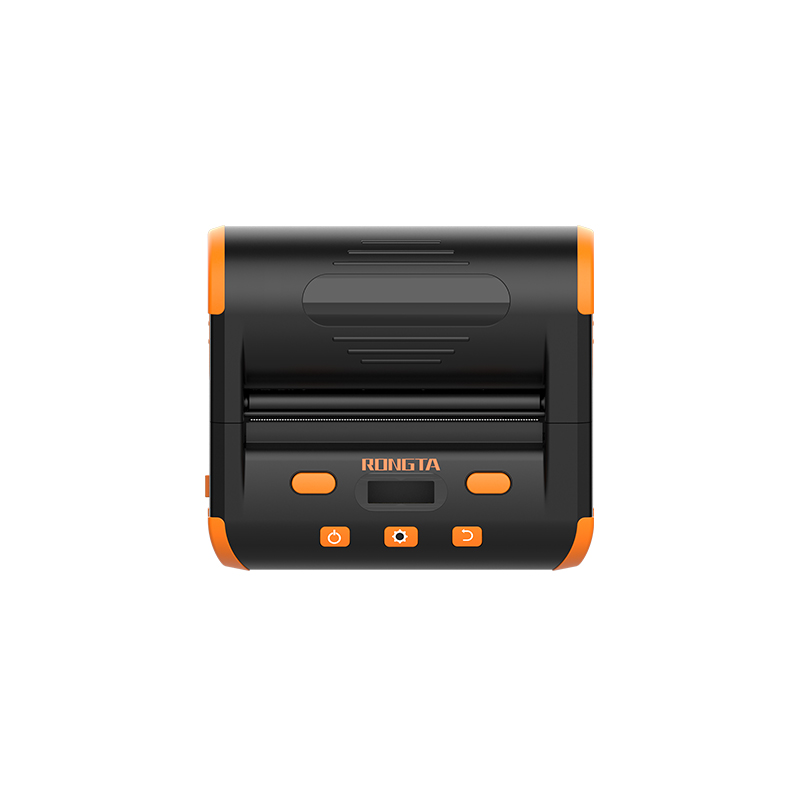 RPP04 4" Portable Label Printer
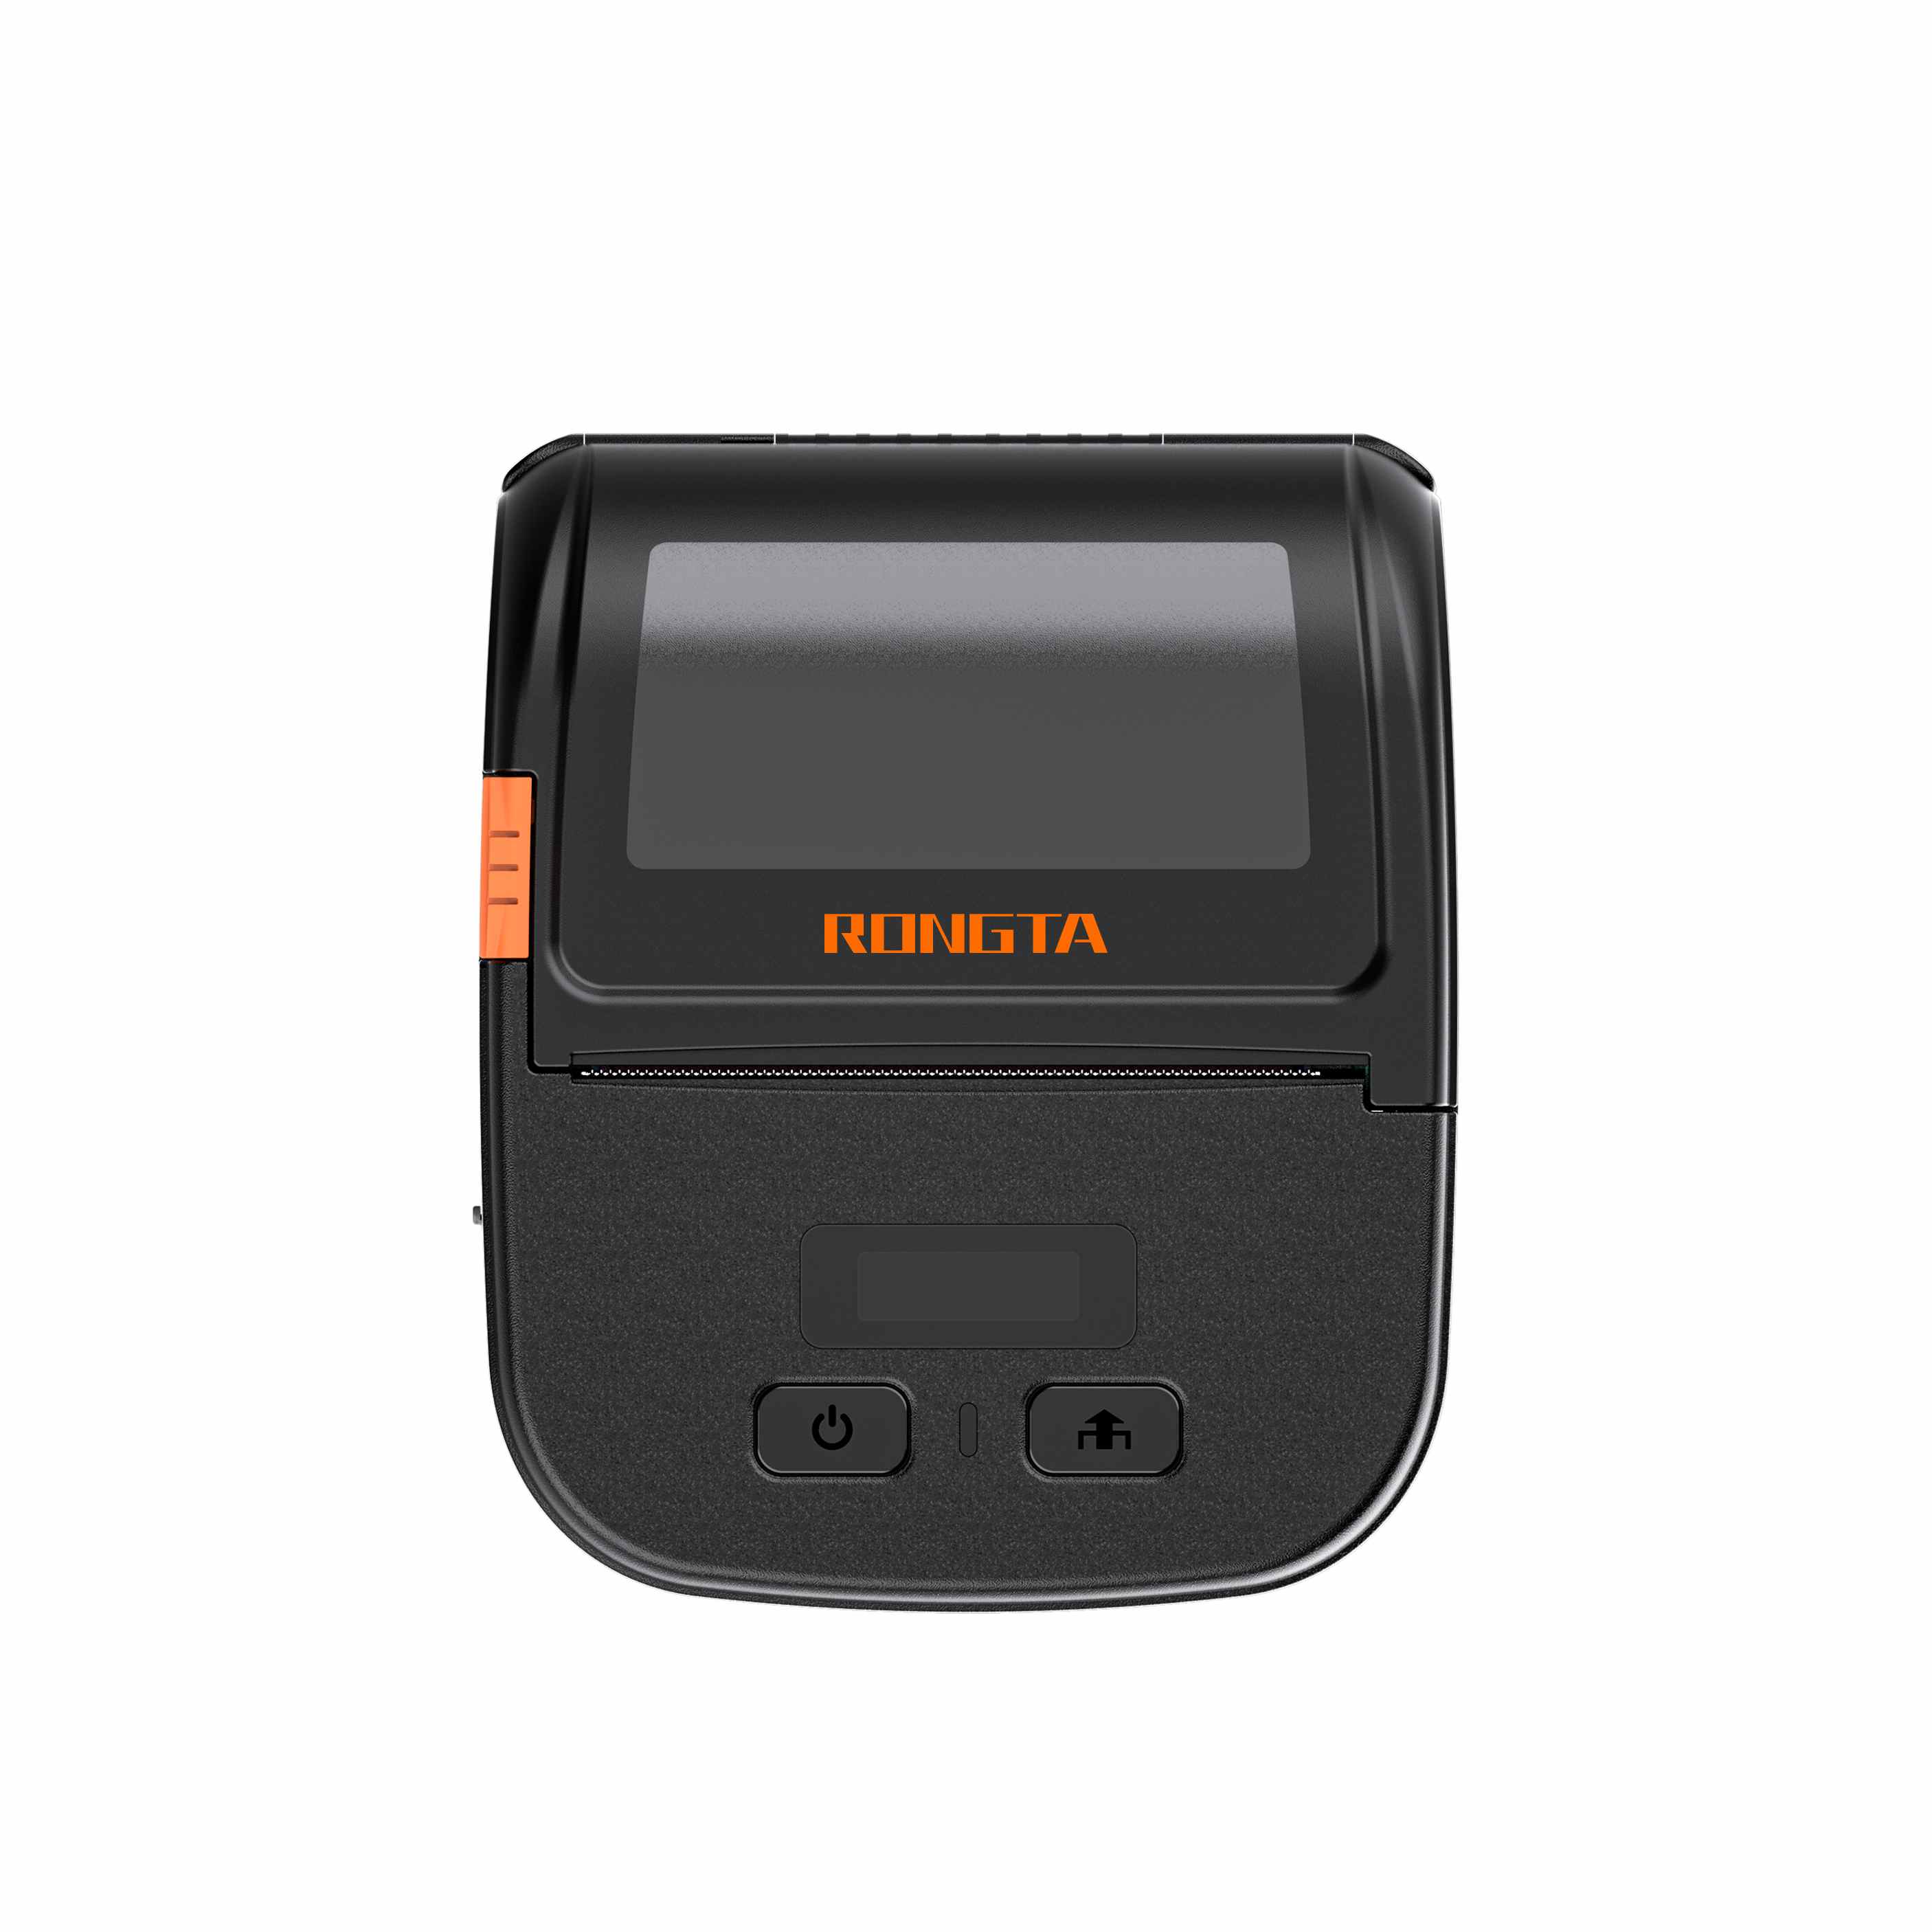 RPP30 3" Portable Label Printer
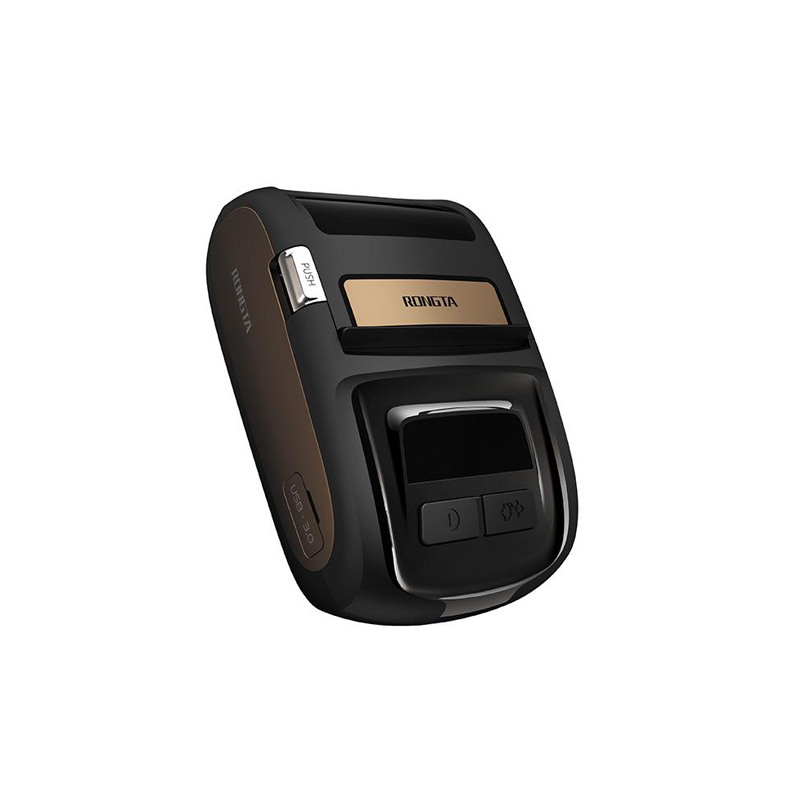 ACE M1 2" Portable Label Printer
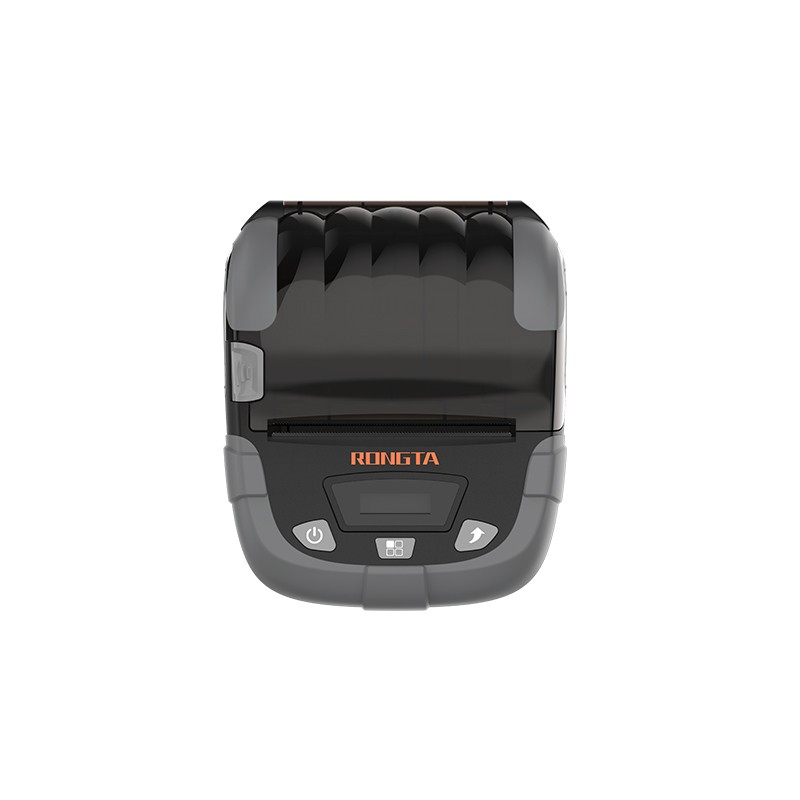 RPP320N 3" Portable Label Printer
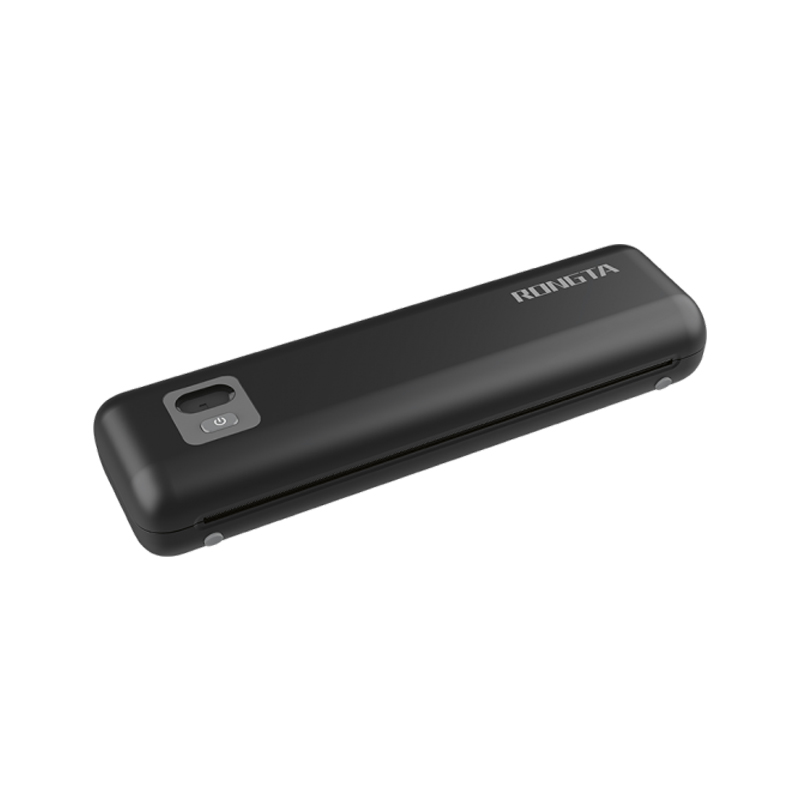 F82A A4 Front-Out Paper Tray Thermal Printer
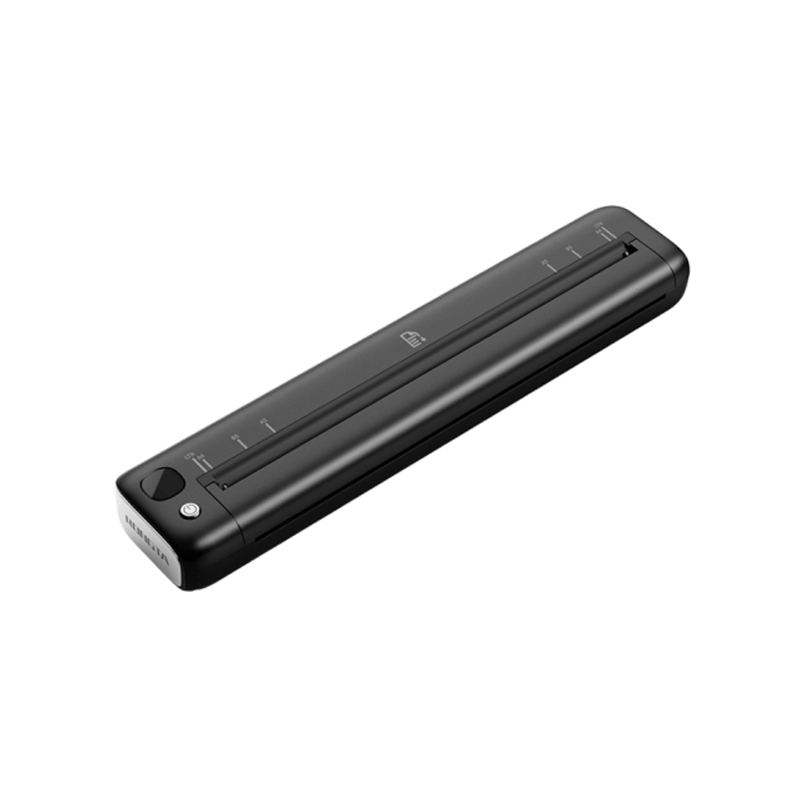 F81A Portable A4 Thermal Printer
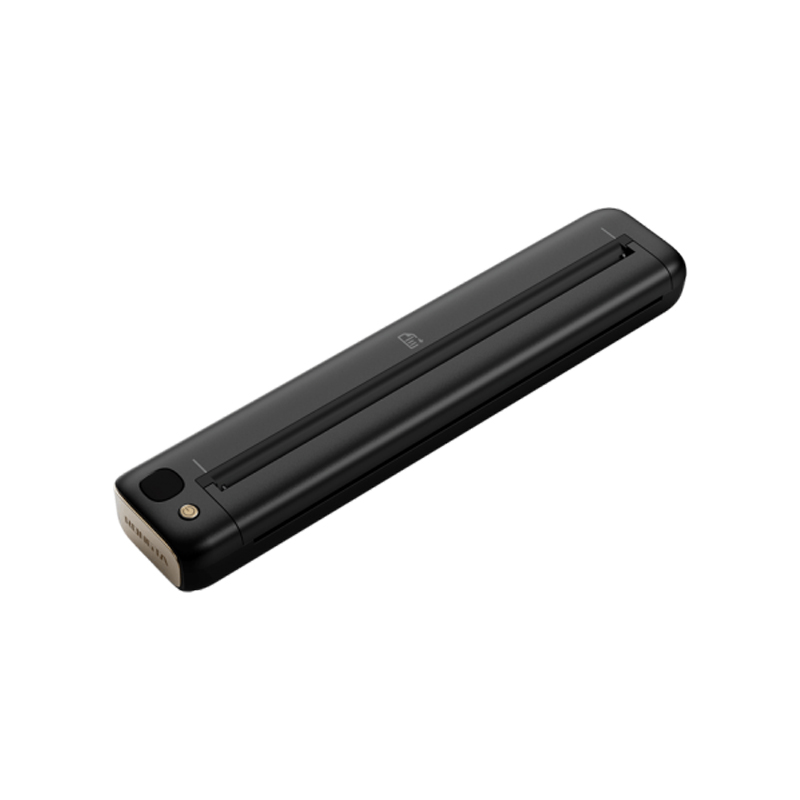 F81S Portable A4 Tattoo Printer
 Z1 Children's Educational Photo Printer
 R5 Mini Label Printer
 RP07 58mm Embedded Printer
 RP203 58mm Embedded Printer
 PM315 Embedded Thermal Printer
 PM201 48mm Printing Module
 PM628 58mm printing module
 PM532A Printing Module
 PM532B printer module
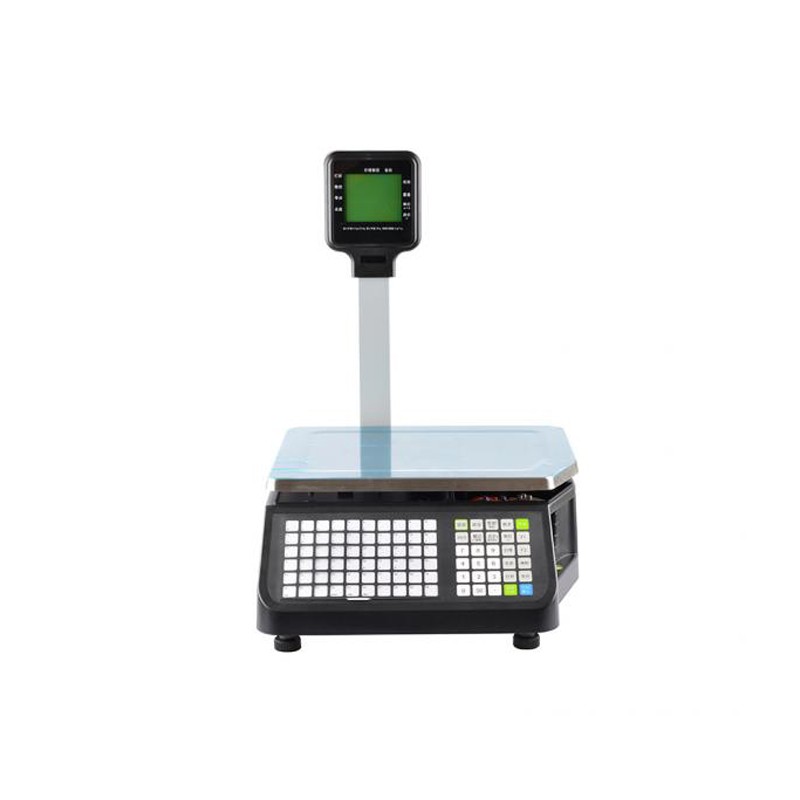 LS015/LS015A Barcode Scale
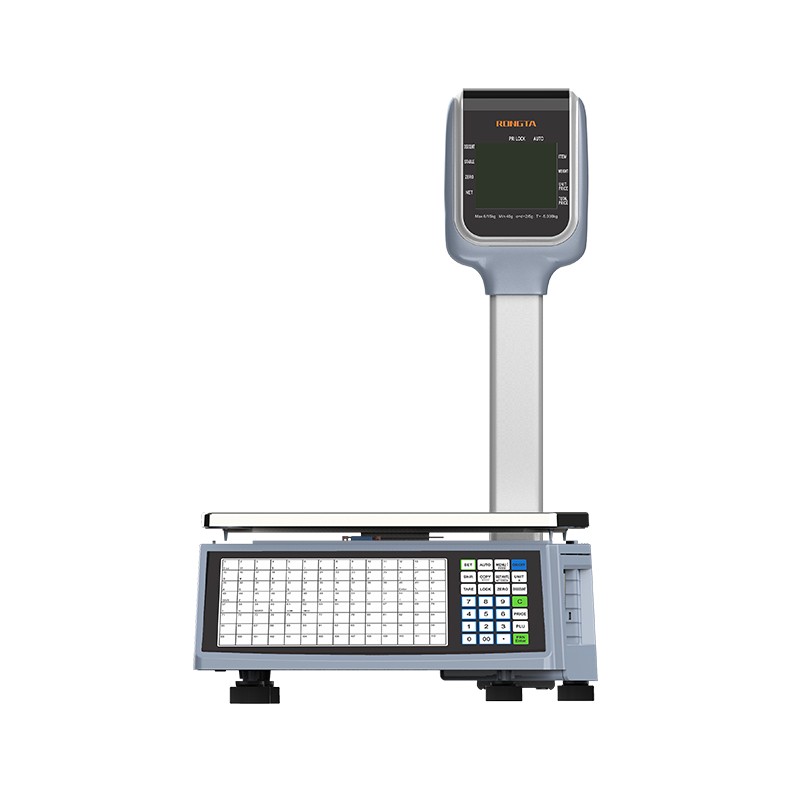 RLS1815D/RLS1830D Barcode Scale
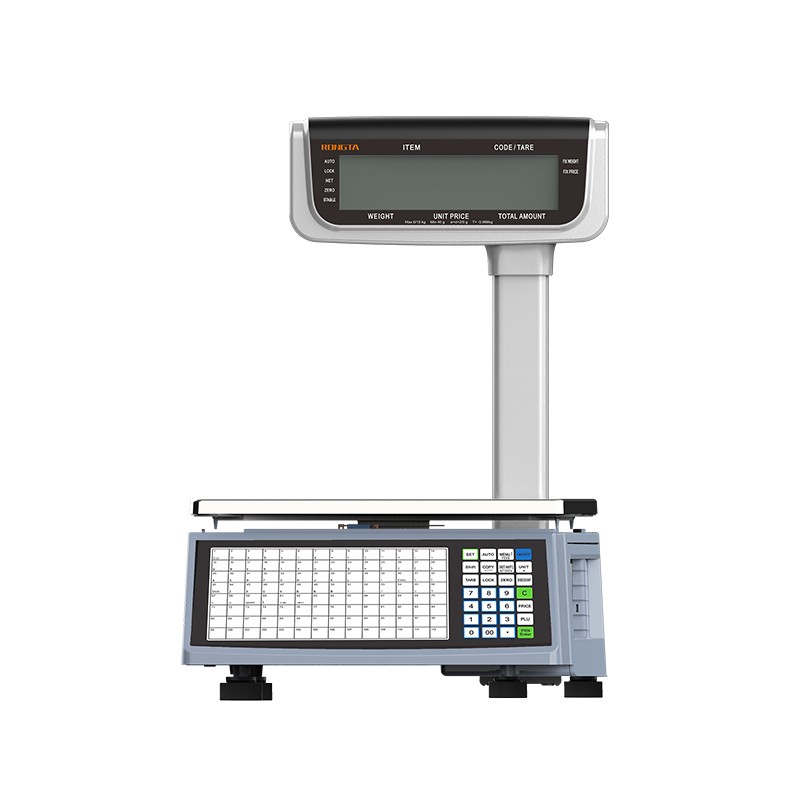 RLS1815C/RLS1830C Barcode Scale
 AURORA S2L-S Labelless Scale
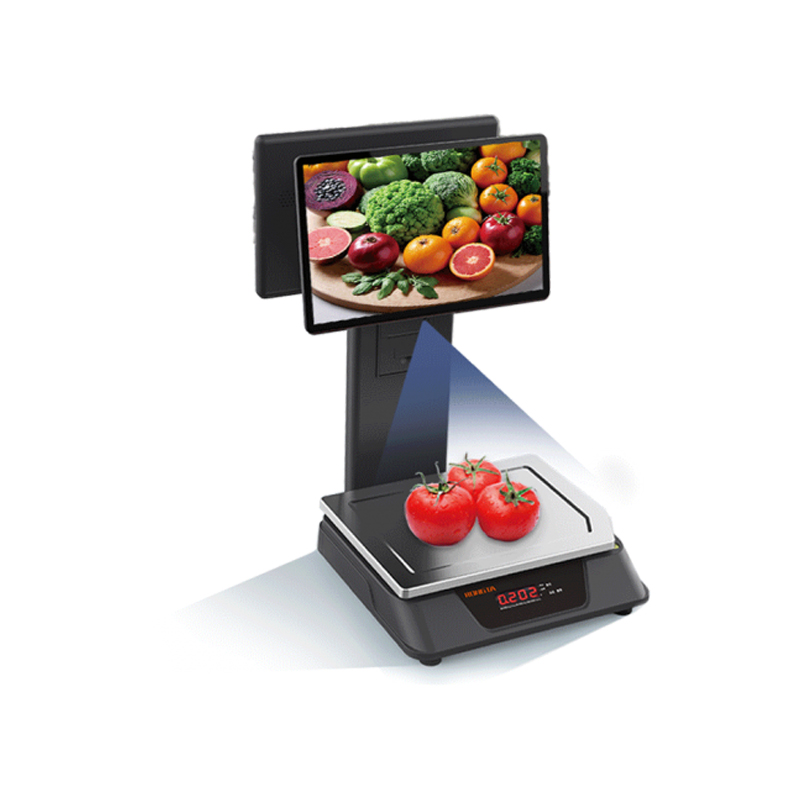 AURORA E1 PRO-AI Cash Register Scale
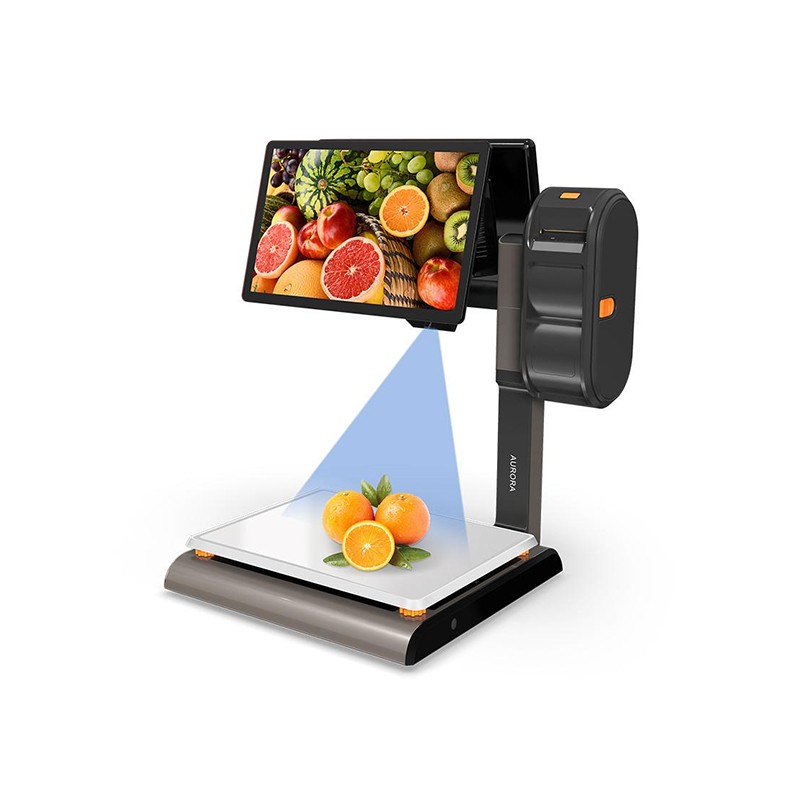 AURORA S2L-AI Label Scale
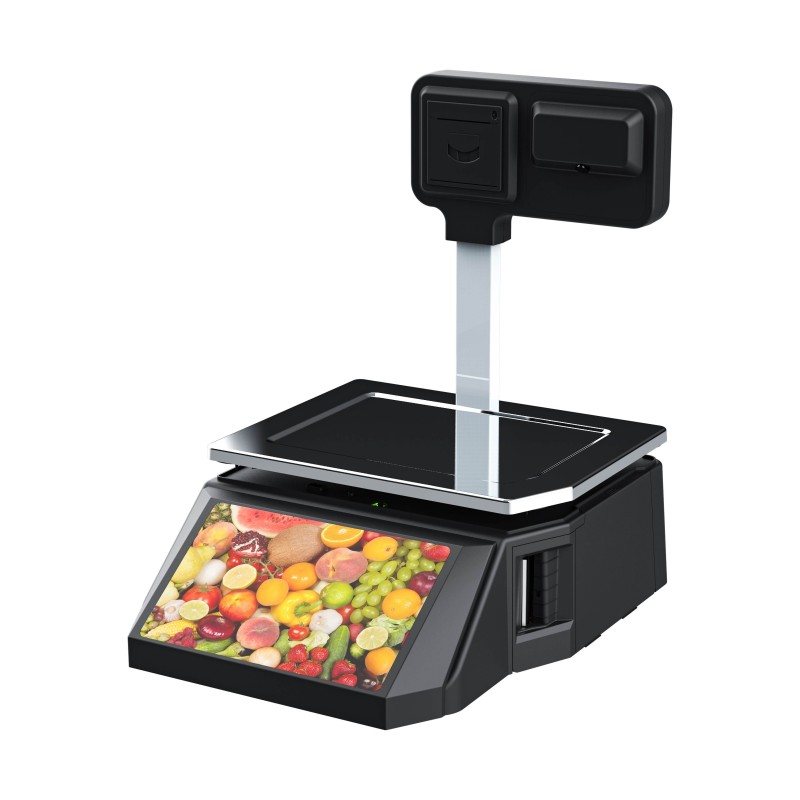 DP01-AI Smart Tag Cashier Dual-Use Scale
 C3 Weighing Scale
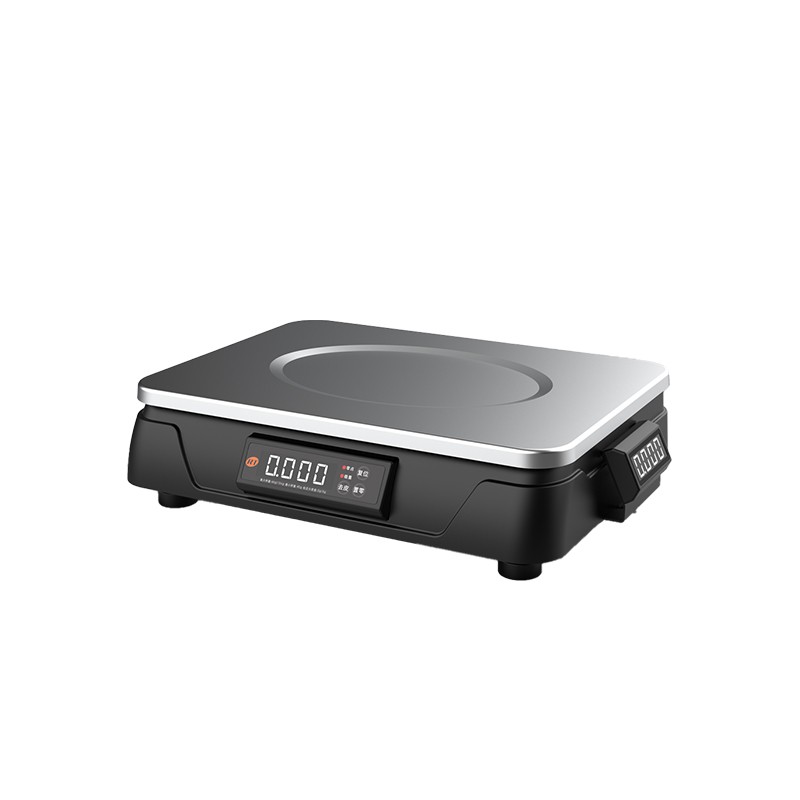 C1 weighing scale
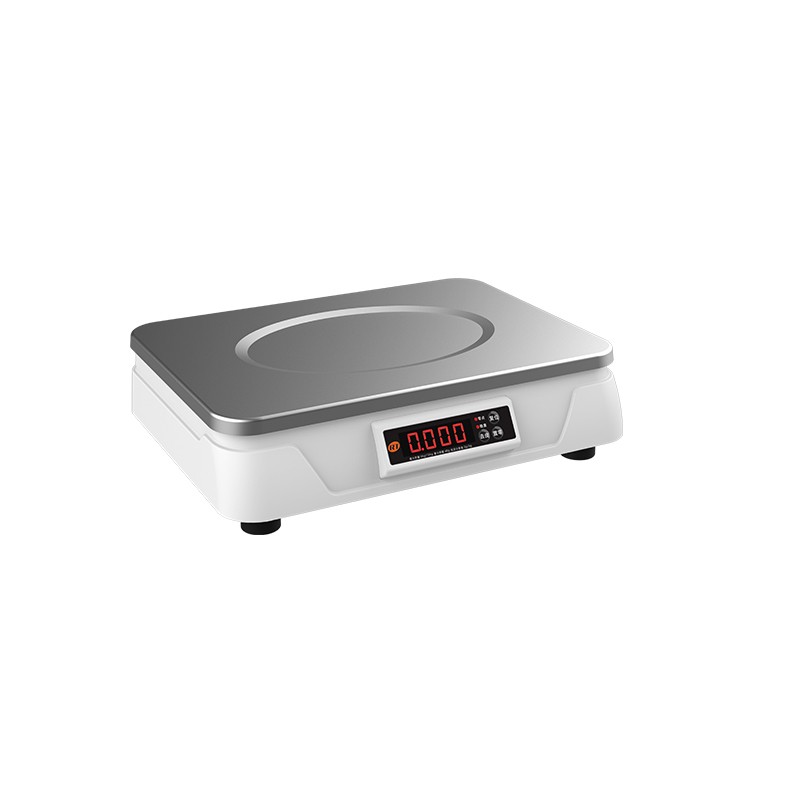 C11 Weighing Scale
 retail
 FOOD
FOOD Medical
 Mobile office/home
 asset Management
 logistics
 Driver download
 User Manual
 Tool Download
 Tag software
 Product Video
 Development Documentation
 Frequently Asked Questions
 User Guide
 Company News
 Exhibition Updates
 Industry Insights
 Product Update
 General situation
 Development history
 Honors and Qualifications
 R&D strength
 Team activities
 Social responsibility


Label printer FAQ document
Table of contents
5.concentration/Speed ??settings
6.Command switching (if supported)
Steps to print driver test page
Driver port configuration steps
Driver settings collect print data
Drive halftone function adjustment
Driven concentration/speed/Data compression/Media Adjustment
II. Common Problems and Solutions:
3.Printing garbled characters problem
8.The printer cannot be turned on.
three,?Daily cleaning and maintenance:
IV. After-sales contact information:
I. Basic Printer Operations:
1. Print the self-test page
Self-test page instructions:When installing the printer for the first time or when there are any problems with the printer, you can run a self-test program. The self-test page includes: printer model, serial number, firmware version, command status, print density, print speed, and interface information, etc.
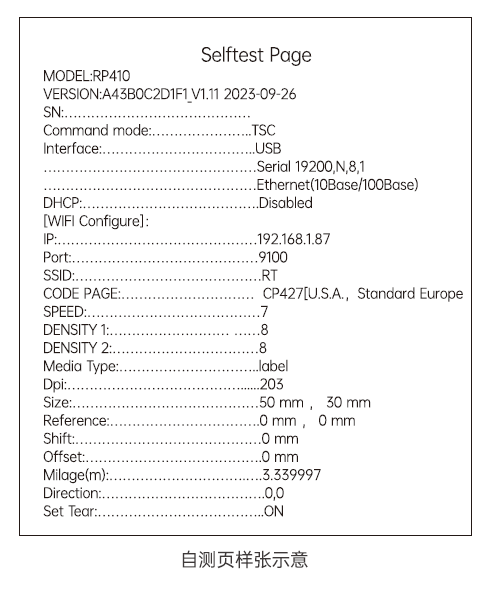
How to print the self-test page:
First, turn off the printer. Then, press and hold the paper feed button while turning the printer on until the paper starts printing (about 2 seconds). Then, release the paper feed button.
2. Restore factory settings
Factory reset instructions:
The printer's firmware is fixed at the factory with settings such as density, speed, command mode, IP address (192.168.1.87), and default Chinese characters. To quickly resolve issues, sometimes restoring the printer to factory settings can be used to adjust the settings.
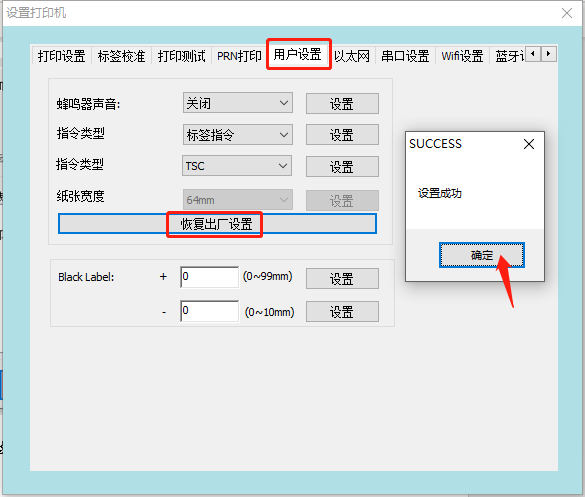
Restore label tool to factory settings:
① Open the label settings tool and selectSetting up the printer;
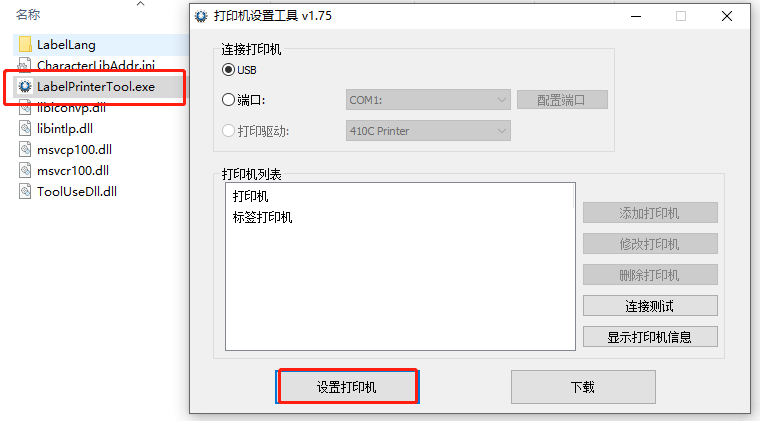
② Switch toUser SettingsInterface, click"Restore factory settings"A success message will pop up; click [the button]."Sure"That's all;
3. Tag Learning
The AD value of the backing paper of different labels is inconsistent with the pressure difference of the paper's AD value. Therefore, when replacing label paper of different specifications, label learning is required. Label learning is divided into two types: manual label learning and tool label learning (the effect is the same).
Manual tag learning method:
The printer is ready. Press and hold the paper feed button for two beeps, then release it. The label paper will automatically feed and check its position. When the label paper stops at the tear position, it means that the label learning was successful.
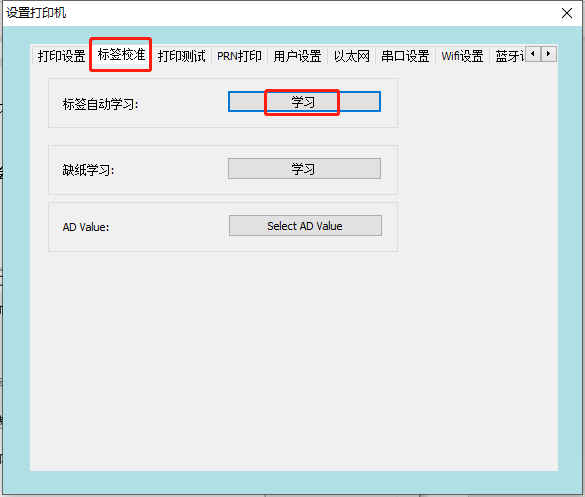
Learning with tags using tagging tools:
① Open the label settings tool and selectSetting up the printer;

② Switch to"Label Calibration"Interface, selectAutomatic tag learningClick"study"The label paper will automatically feed and check its position. When the label paper stops at the tear position, it means that the label learning is successful.
4. Learning without paper
The main function of paper out learning is to store the AD value when there is a paper out state in the printer's FLASH, so that the printer can correctly identify the AD value when there is a paper out state. If the AD value is lost when there is a paper out state, an abnormality of 2 error alarms may occur.
Using labeling tools to learn methods when paper is scarce:
① Remove the paper from the printer, close the top cover, and keep the printer powered on;
② Open the label settings tool and selectSetting up the printer;
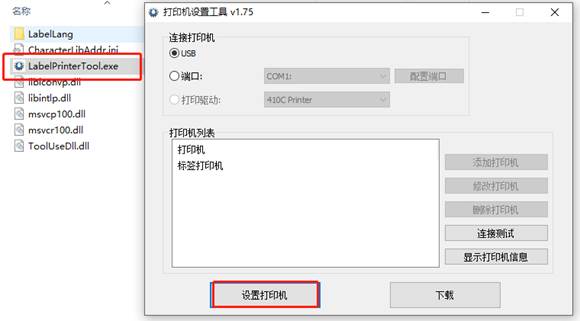
③ Switch to"Label Calibration"Interface, selectLearning without paperClick"study"The printer will normally beep 3 times to indicate that paper is out;
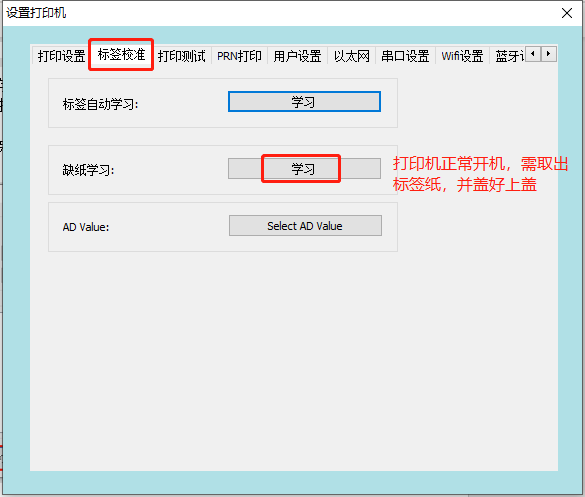
④?Learning without paperAfter completion, automatic tag learning is also required. For details, please refer to [link/reference needed].Tag learningmethod;
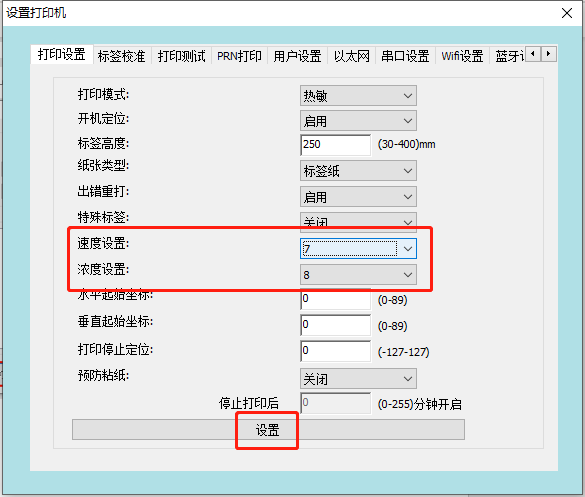
5. Concentration/Speed ??Settings
Printer densityThis refers to changing the heating time of the printhead to achieve different printing density effects. Customers can change the printing density within an optional range according to their printing needs.Printer speedThis refers to adjusting the paper output speed of the printer by controlling the rotation speed of the stepper motor. Customers can adjust the printing speed within an optional range according to their printing needs.
How to set concentration/speed using the label tool:
① Open the label settings tool and selectSetting up the printer;

② Switch toPrint settingsInterface, inSpeed ??settings/concentration settingsSelect the desired speed and concentration from the drop-down menus, then click the button at the bottom of the screen."set up"Item, prompt"Setup successful"A single beep from the printer indicates that the settings have been changed successfully.
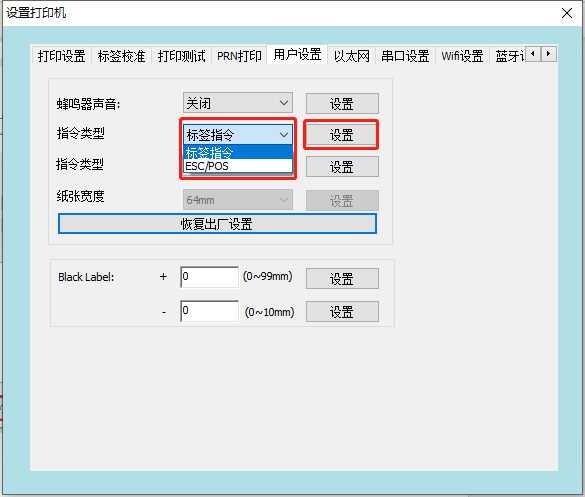
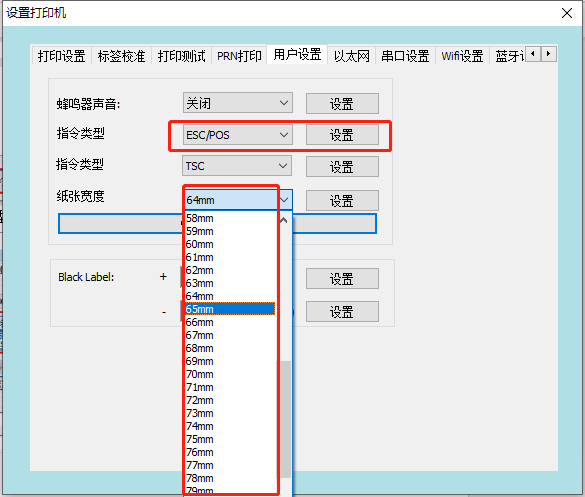
6. Command switching (if supported)
Under normal circumstances, Rongda's label printers support two command modes: label and ESC/POS receipt. When the printer needs to print thermal receipts, it can switch to ESC/POS mode for printing. When the printer needs to use labels, it can switch to label command mode.
Use the label tool to set the instruction type:
① Open the label settings tool and selectSetting up the printer;
② SwitchUser SettingsSelect the command type in the second line of the interface."Label instructions"or“ESC/POS”Command, and click"set up";
Note: In the instruction type options in the third row, the different label instruction selections only apply to custom types, so this item does not need to be set;
③ When settingESC/POSWhen giving instructions,Paper widthDifferent thermal paper printing widths can be adjusted;
7. Firmware upgrade
Printers require internal software firmware to function properly. Rongda will adjust the printer firmware according to the printer's operation. Sometimes, customers need to resolve certain program bugs, which requires firmware upgrades.
The program file contains information such as model number, interface, instruction type, and version date. Example:

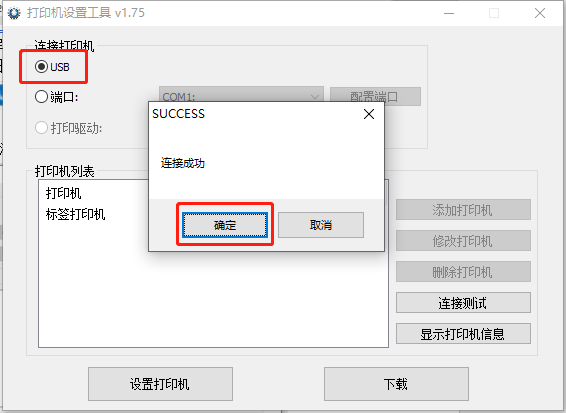
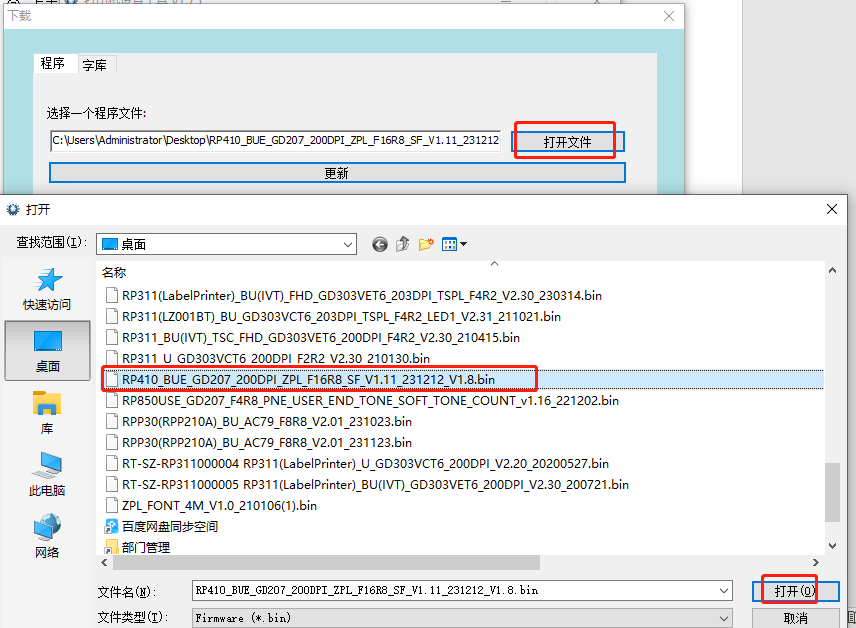
How to upgrade firmware using a tag tool:
① Connect the printer power cord, connect the USB cable to the computer, and turn on the printer.
② Open the label settings tool and clickConnection test,hintConnection successful;
③ Click"download"Switch to"program"Download interface;
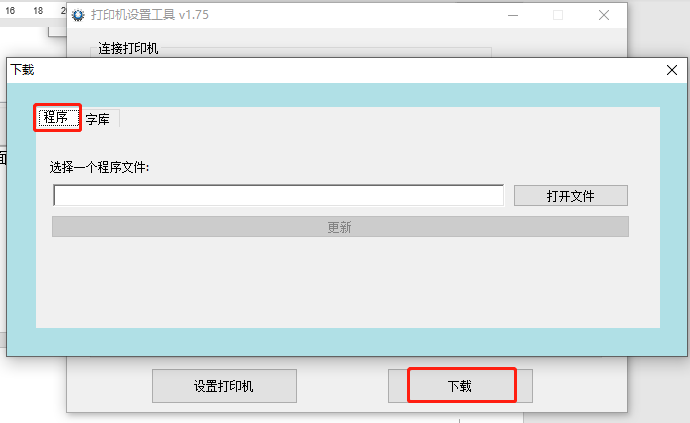
④ Click to open the file, select the firmware provided by the manufacturer, double-click the printer firmware to open it;
Note: Firmware versions for different hardware cannot be upgraded arbitrarily. Before upgrading the firmware, please confirm whether the current printer firmware version is applicable.
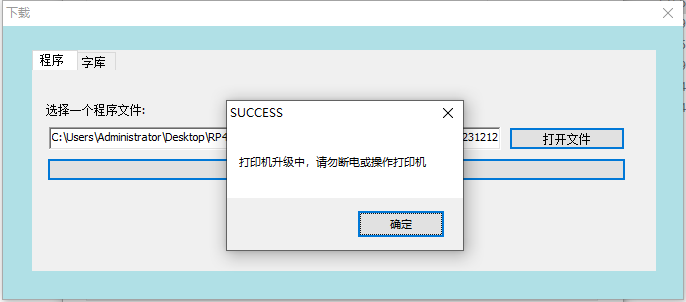
⑤ Click Update. A message will appear saying "Printer is upgrading. Do not power off or operate the printer." At this time, you must wait patiently for the printer to upgrade automatically and must not perform any operations.
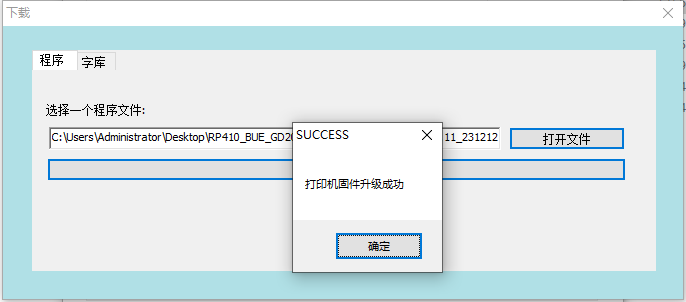
⑥ Wait approximately 15 seconds. Once the printer update is successful, it will automatically restart and display a message saying "Printer firmware update successful".
8. Font upgrade
The font library is stored in the printer's internal FLASH memory.?The preset font file is used by the printer to call the font when printing instructions;
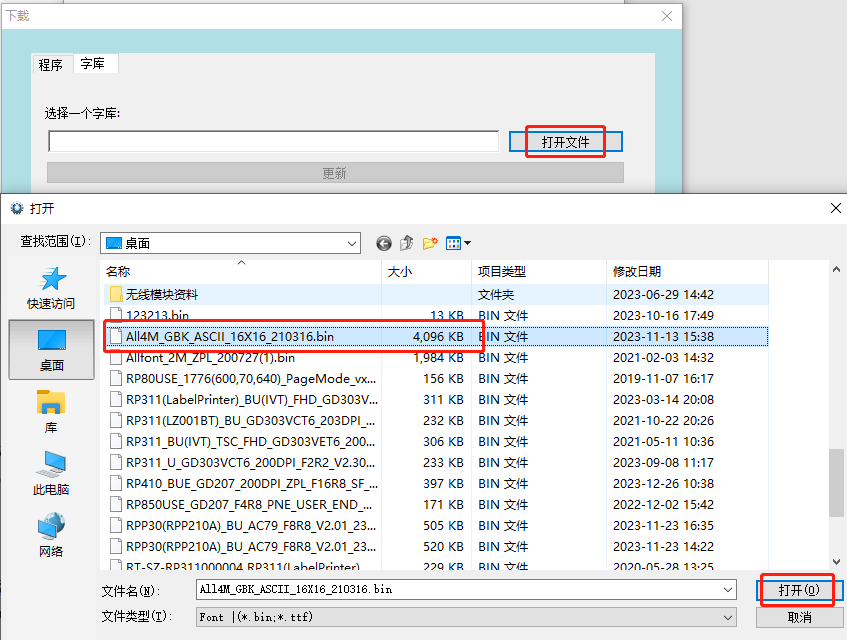
How to update the font library using the tag tool:
① Connect the printer power cord, connect the USB cable to the computer, and turn on the printer.
② Open the tag settings tool, click "Connection Test," and a message will indicate that the connection was successful;

③ Click"download"Switch to"Font library"Download interface;
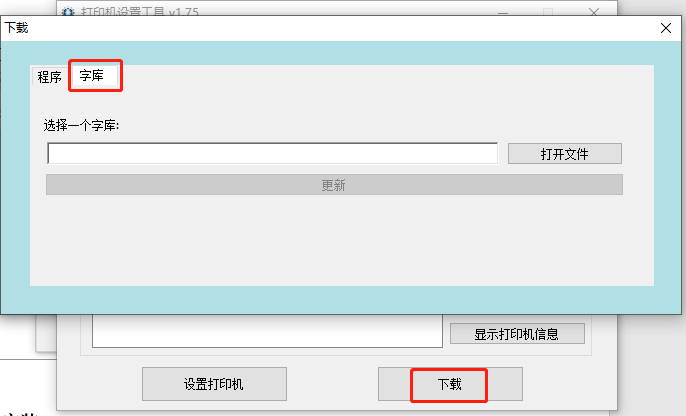
④ ClickOpen fileSelect the font file provided by the manufacturer, double-click the printer font file to open it;
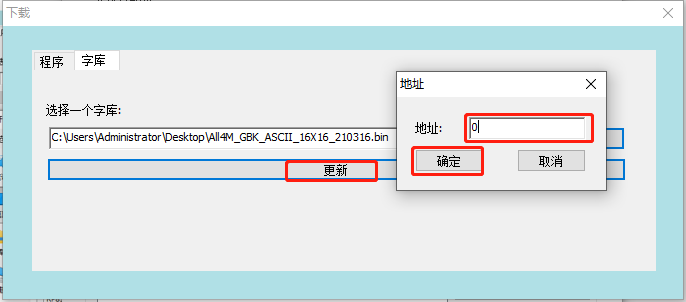
⑤ Clickrenew,existAddress boxEnter the corresponding font library address provided by the manufacturer (the standard font library address defaults to:?0?);
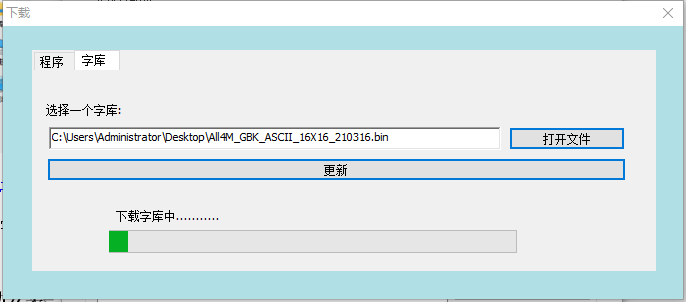
⑥ After confirming, start the font download (wait for the green transfer bar to reach the far right). After the font is updated, you usually need to turn the printer off and on again for it to take effect.
9. Windows driver installation
Printer drivers, as software programs on a computer, make it easier for customers to edit images and transfer print data. Therefore, many customers need to install drivers to print when using a printer.
Driver download: AccessibleRongda Official Website(http://m.tjhq.cc/category/downloads/1Download;
Before installing the driver, please ensure that the power supply is connected and the USB cable is connected to the computer. The following illustrations may differ depending on your computer's operating system. The following example is based on the Windows 10 operating system. It is recommended to disable any related security software before installation to avoid interfering with the driver installation. The driver is an integrated driver and will automatically install the driver that matches the printer's command language.
Driver installation steps
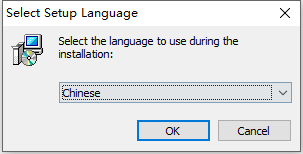
① Double-click the driver file
② A dialog box as shown below will pop up. Select the installation language and click [here]."OK";
③ A dialog box will pop up as shown in the image below. Select..."Install";
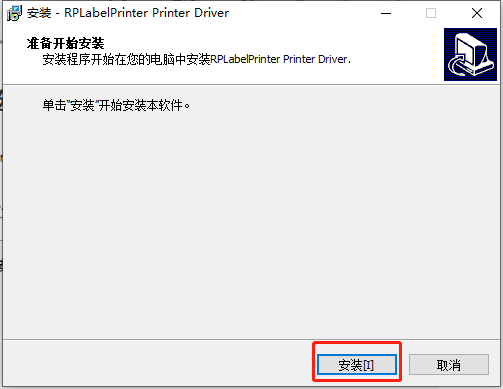
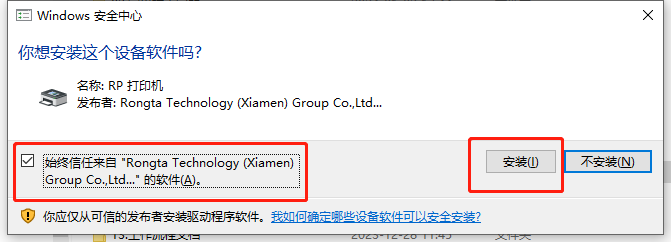
④ Follow the prompts to select and check the box to trust Rongda software sources, then click."Install";
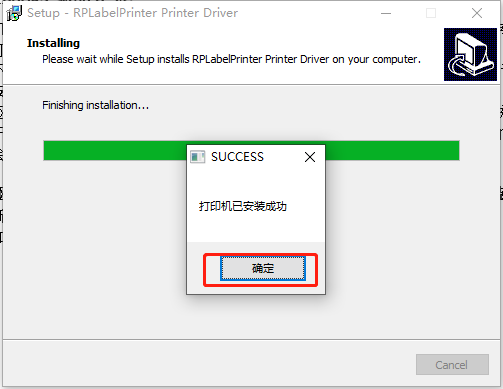
⑤ A message will appear after successful driver installation."Printer installed successfully";
10. Driver settings function
Customers can adjust the driver parameters and paper size according to their actual usage needs, using Windows 10.?Taking the system as an example, the following are the steps to adjust the driver settings.
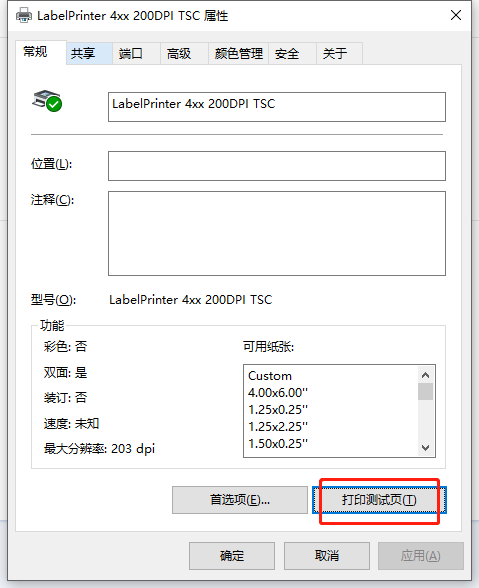
Steps to print driver test page:
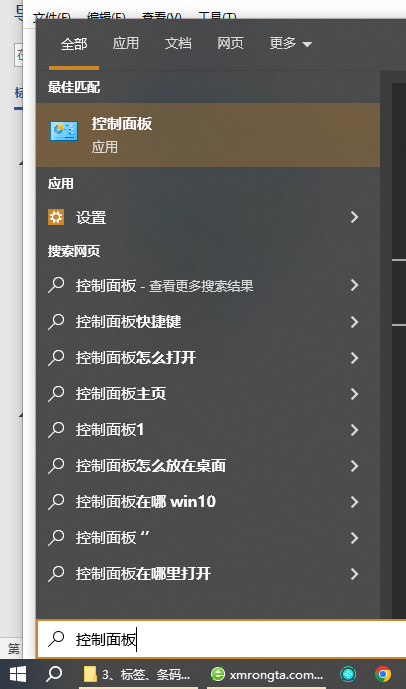
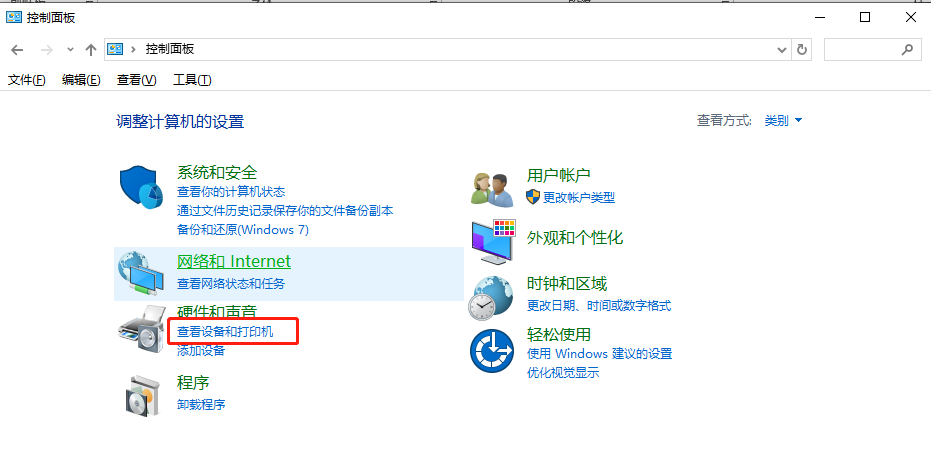
① Open the Control Panel. Enter "Control Panel" or "control panel" in the search box in the lower left corner to access the Control Panel interface;
② InControl PanelSelect and double-click in the interfaceCheck the equipment and printericon
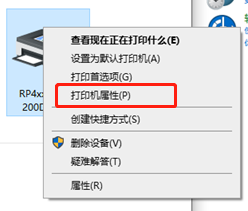
③ Locate the icon of the installed driver. The following example uses the (RP4XX Series200DPI ZPL) driver. Right-click and select Printer Properties.
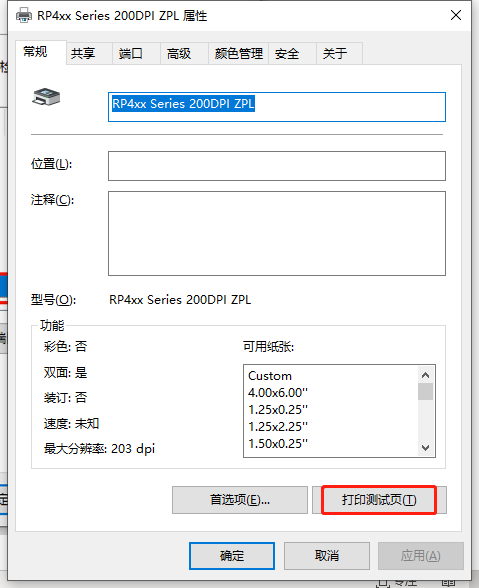
④ Click the print test page function. If the printer prints the test page successfully, it means that the driver port is set correctly, and the printer driver can print normally at this time.
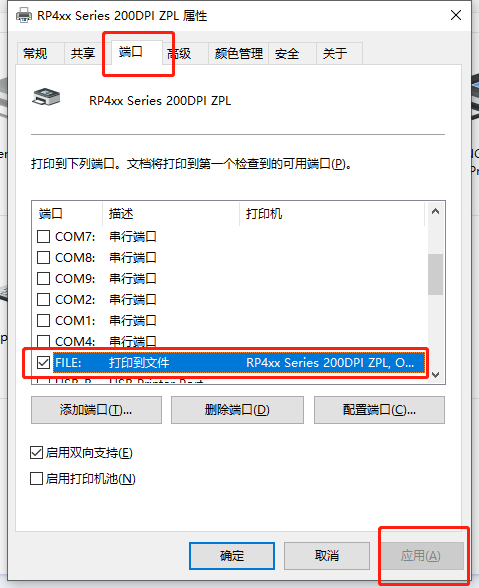
Driver port configuration steps
After opening the printer driver properties, switch the port and select the corresponding port according to the actual port you are using.

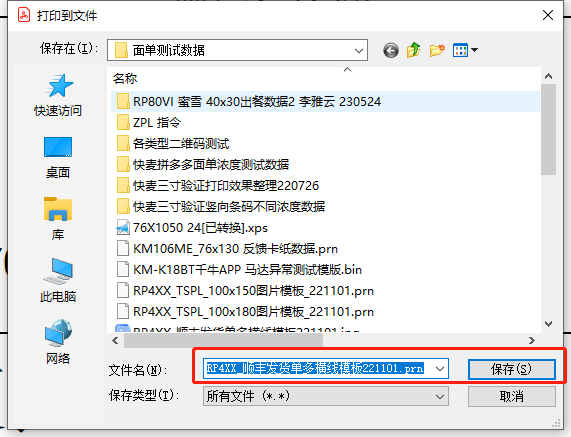
Driver settings collect print data
① After opening the printer driver properties, switch the port, select the FILE option according to the actual port being used, and save;
② Print a normal document through the driver. A save file dialog box will pop up. Name the file and save it as follows.prnThe file is sufficient;
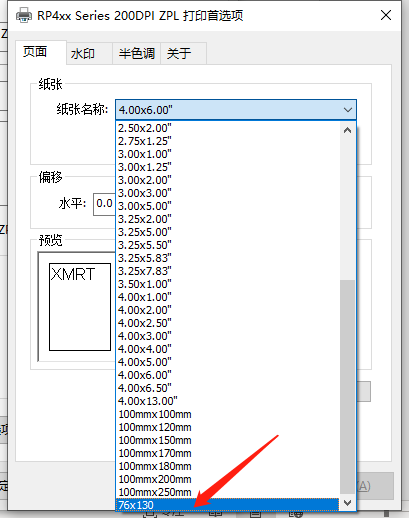
Driver modifies label size
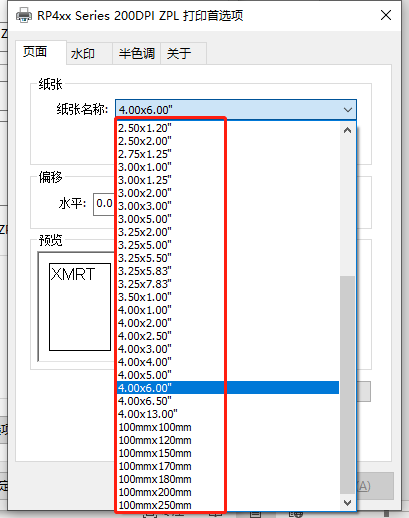
Customers can modify the paper size settings in the driver to match the actual label size used.
① The driver has preset sizes by default. Users can select the corresponding preset size by selecting the paper name from the drop-down menu and then click OK.
② Customize size, selectPaper Management
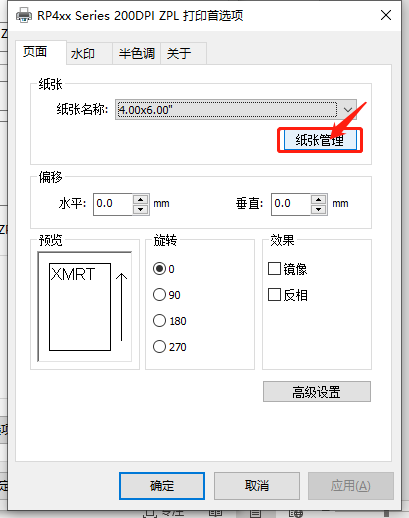
③ In the pop-up interface, enter the paper name, paper width, and paper length, etc., and then...keep;
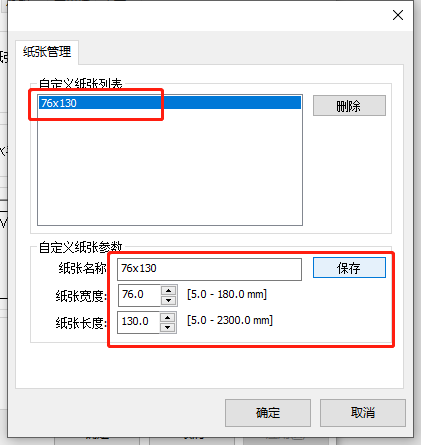
④ Return to the page interface in the first item, and select the name of the paper you created from the drop-down menu;
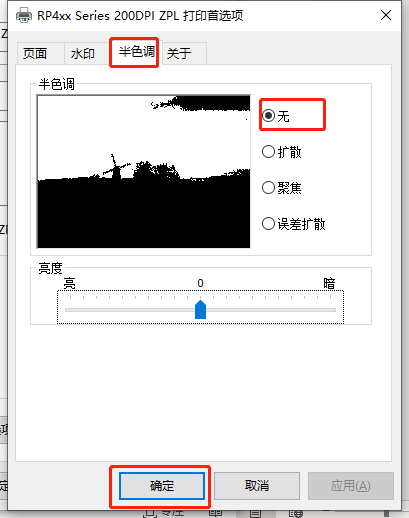
Drive halftone function adjustment
Customers can adjust the halftone category and brightness value to improve the printing quality of images or documents, as follows:
① Open the printer driver properties—Preferences—Toggle Halftone, select None, brightness 0, and confirm to adjust;
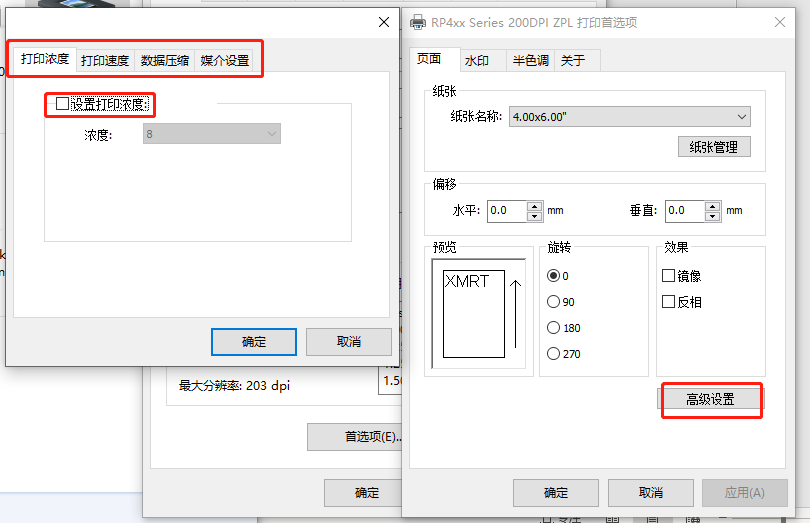
Drive concentration/speed/data compression/media adjustment
Adjust the printer's density, speed, data compression, media, etc., according to your actual printing needs, as follows:
① Open printer properties—preferences, switch to the page interface, select advanced settings, and switch and check the various parameter settings in the pop-up window;
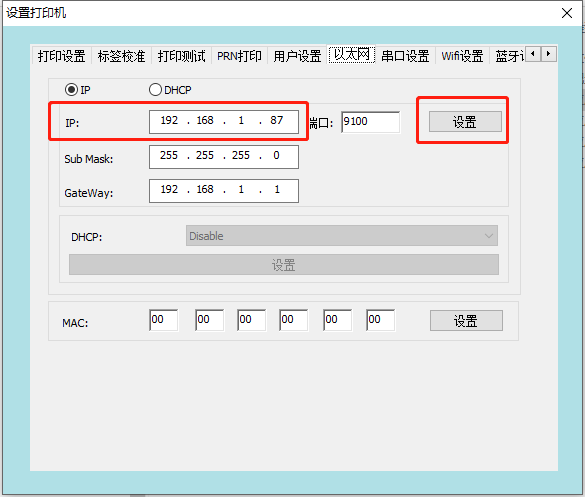
11. Configure the network port IP address
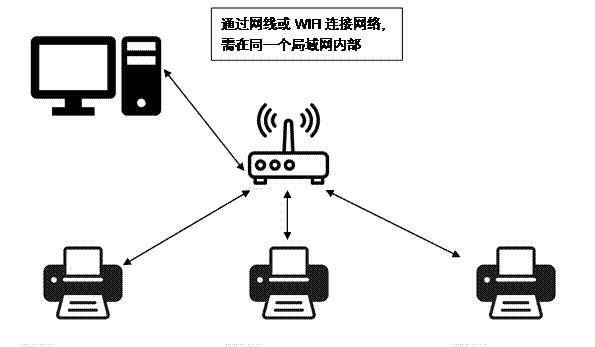
When printing via a local area network port, you need to configure the IP address of each printer first, ensuring that the printer's IP address and the host's IP address are on the same gateway:
Use a tagging tool to modify IP addresses.
① Connect the printer to the USB cable, open the label setting tool, and click...Set up the printer;
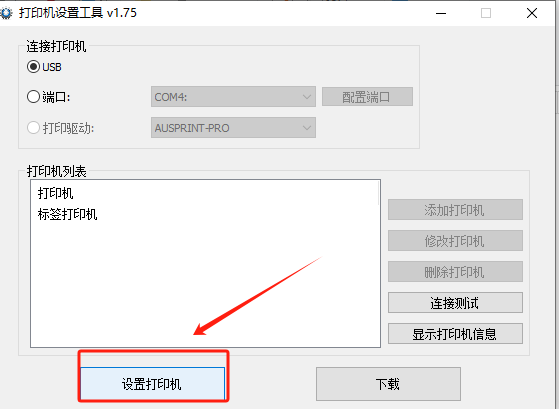
② Switch toEthernetIn the settings interface, enter the new printer IP address and click..."set up"That's all;
II. Common Problems and Solutions:
1. Driver cannot be installed
①?Does the USB cable need to be connected when installing the driver?
The printer requires a USB cable connection to install the driver properly. You need to check if the printer's USB cable is connected properly and if the printer is in standby mode.
②?Check if the driver installation file is faulty;
You can first print a self-test page or find USB printing support in Device Manager to confirm USB printing.?The HID information is used to confirm whether the driver is compatible with the printer.
③?Check if the print spool service is enabled;
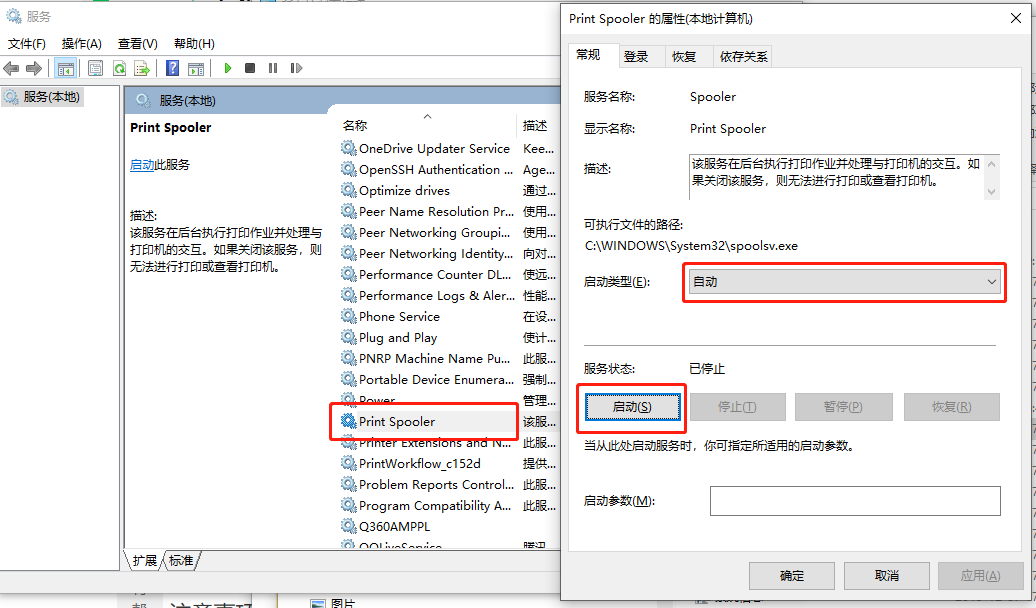
④?Driver icon cannot be displayed
Due to Windows system upgrades, some driver files have not been certified by Microsoft. Therefore, after installation, the driver icon may not appear quickly in the printer list. Restarting your computer can resolve this issue.
⑤?Other driver installation problems
For assistance, please contact our after-sales technical support hotline: 400-800-0596
2. Paper feed error during printing
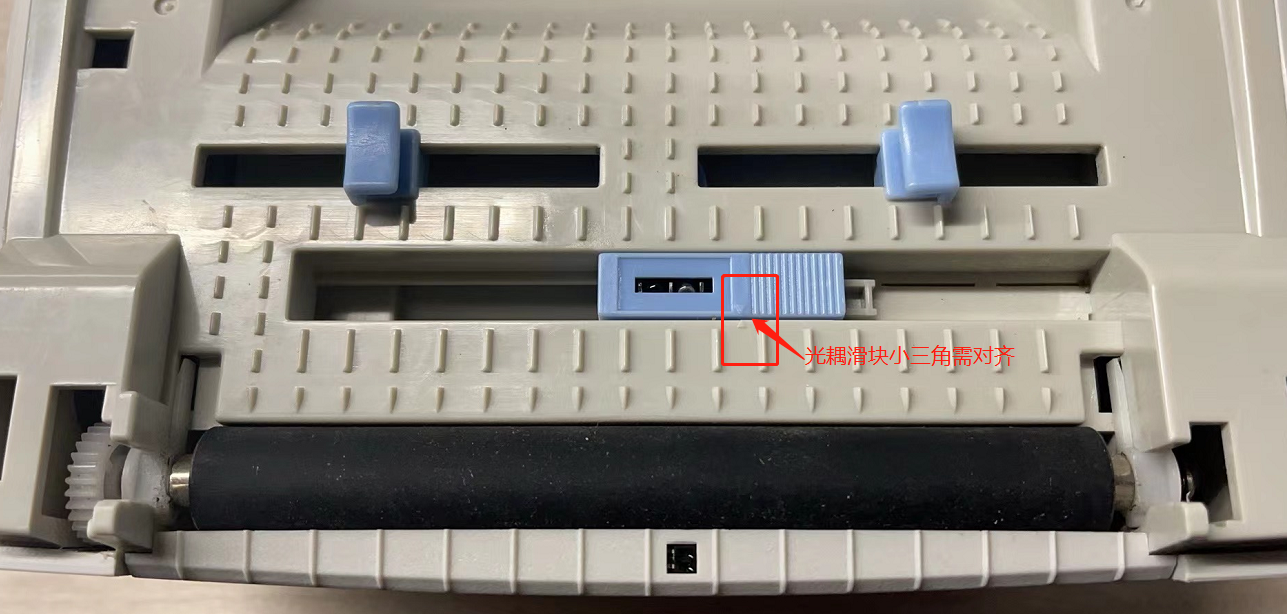
①?Printing blank pages or inaccurate paper feed position
A) Check if the buttons can feed paper normally, then proceed.Tag learningoperate
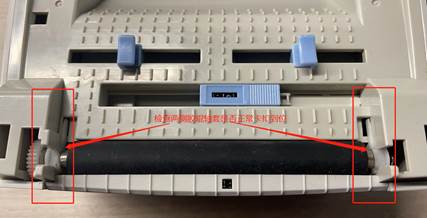
B) Check if the optocoupler is in the correct position.
The Rongda RP310/RP410 series optocoupler slider is designed to slide. When printing labels, the small triangle on the optocoupler slider needs to be aligned with the small triangle on the bracket, as shown in the figure below.
C) Does the drive size match the actual label size?
When the drive size is larger than the actual label size, the printed content may exceed the label, resulting in skipped pages. You can check if the drive size setting exceeds the actual label size, or you can test by setting the drive paper size height to be 1mm less than the actual label height.
For detailed instructions, please refer to:Driver modifies label size;
D)
②?Paper not feeding/paper sticking problem
A) If the printer fails to feed paper, you can test it first.Print self-test pageIs it normal?
B) Check if the printer cover is properly closed/if the rubber roller bushing has come loose;
C) ThroughTools to adjust concentrationReduce both the concentration and speed, then print and test.
D) ThroughDriven to adjust concentrationReduce both the concentration and speed, then print and test.
E) If none of the above can resolve the issue, arrangements can be made.Contact customer service for after-sales support.;
3. Printing garbled characters issue
①?Paper output is normal, but garbled characters appear in the Chinese text section.
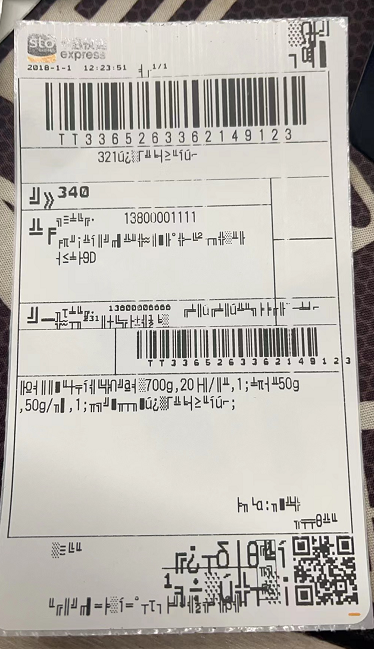
Solution:
A) The requirement is to provide a self-test page to confirm whether the character set is correct;
B) Change the printer language to Chinese;
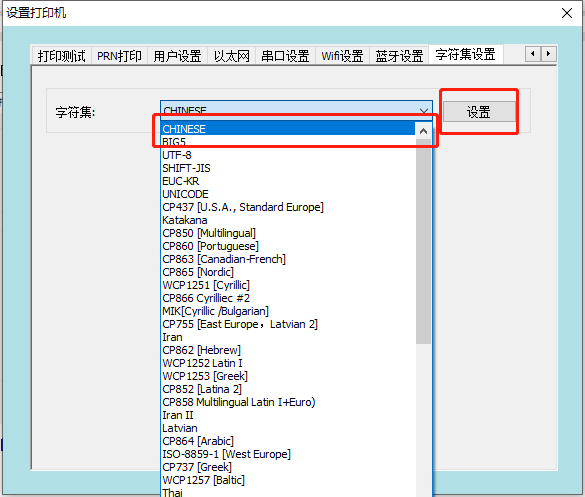
- Connect the printer to the USB cable, open the label setup tool, and click...Set up the printer;
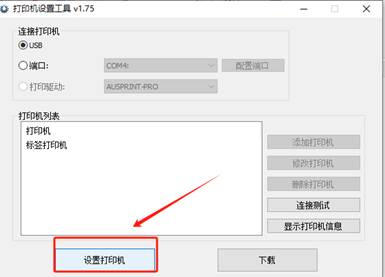
- Switch to the character set settings interface, select CHINESE from the character set drop-down menu, and click "Settings".
C) It is necessary to capture the printed data to confirm whether the problem lies with the data at the bottom of the APP;
You need to provide a test app and related accounts to simulate customer anomalies and then analyze them.
②?The paper keeps printing out and displaying unusual English characters.

Solution:
A) Print the self-test page to confirm if the command mode is set to [mode].ESC/POS
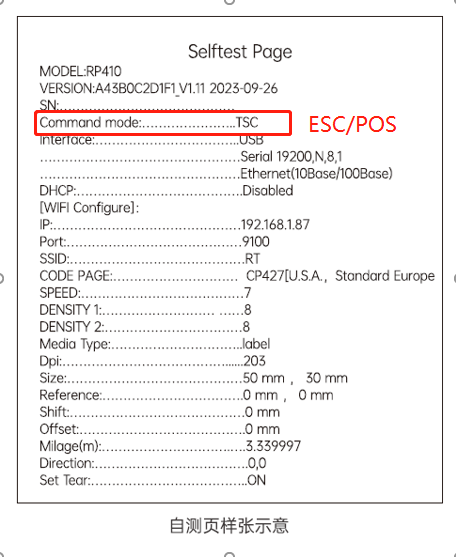
B)?Switch command modeSwitch the printer mode to label mode;
③?A small amount of garbled characters and misalignment appeared in the middle of the printed document.
Solution: Check if the printer's connection cable is loose; unplug and replug the data cable or replace it with a new one.
④?When printing documents, some Chinese characters turn into black blocks.
Solution:
A) Contact technical support and provide the self-test page information.
B) Technical support provides corresponding font updates and upgrades to resolve issues.
4. Printing blurriness error
①?blurry print
Solution:
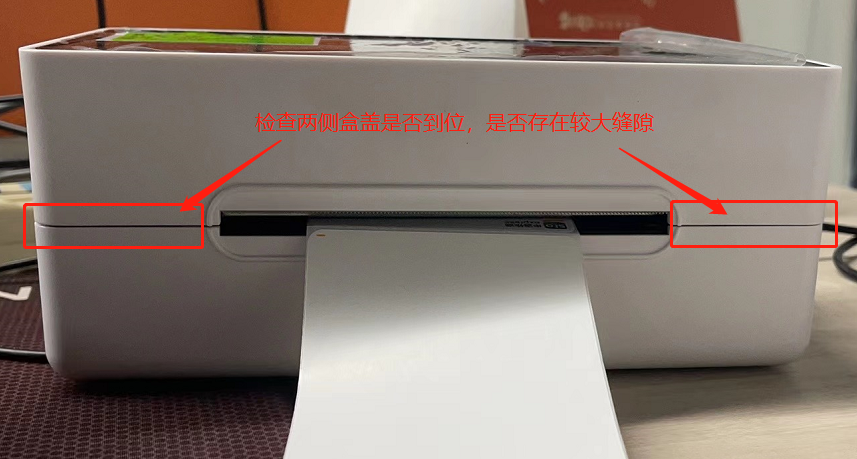
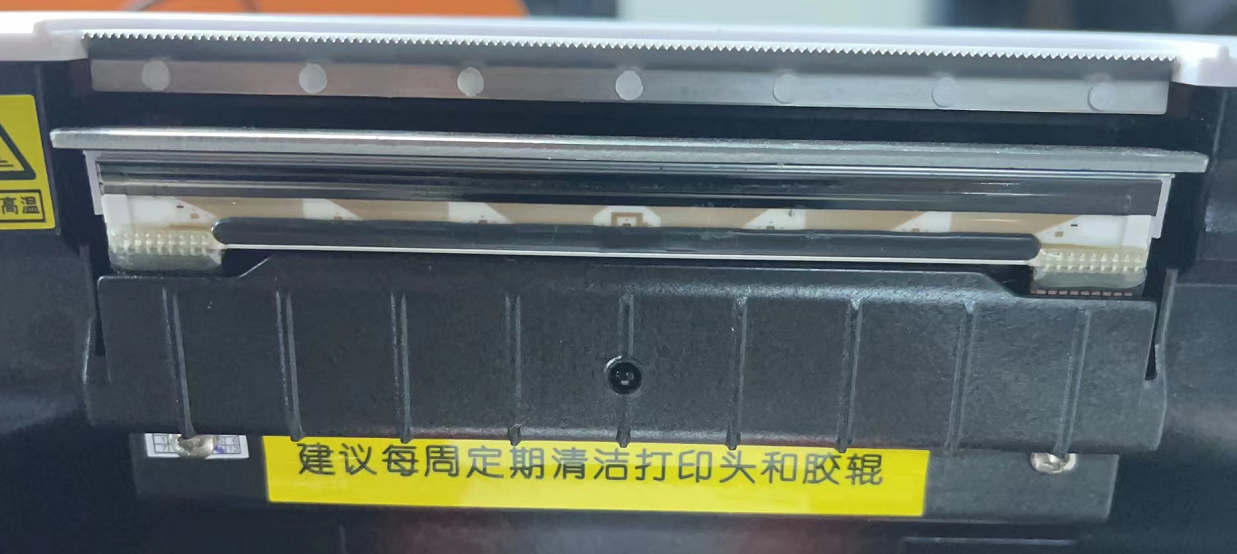
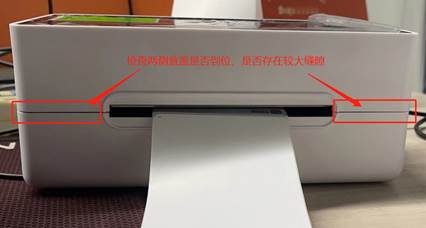
A) Check the top cover: Check if the printer top cover is properly closed.

B) Check if the rubber roller bushing has come loose;
C) Check for assembly problems with the head piece and perform...Head cleaning;
D) ContactRongda After-sales Servicedeal with;
②?Vertical white lines appear in the printed content.
Solution
A)?Clean the print headConfirm whether it is valid;
B) ContactRongdaAfter-sales serviceReport a repair;
③?Print density too high or too low
Solution:
A)?Adjust print density using tools
B)?Drive to adjust print density
5. Printer beeps an error message.
①?Two error beeps indicate that the paper shortage learning flag has been lost.
Cause analysis: The paper out learning flag is lost due to the printer not performing paper out learning or an abnormal power outage.
Solution:
Need to be doneLearning without paperandTag learning
②?Three error beeps indicate a paper shortage.
Cause analysis: The printer is out of paper or is falsely reporting a paper shortage.
Solution:
A) Check if the paper is installed correctly.
B) ConductLearning without paper
C) If none of these solutions work, the optocoupler may be faulty and requires further investigation.Contact after-sales serviceReturn to factory for testing
③?Five error beeps indicate a printhead overheating error.
Cause analysis: Overloading the printer caused the print head to overheat or malfunction.
Solution:
A) When printing is overloaded, you need to wait for about 5 minutes until the print head temperature cools down before you can continue printing;
B) If the printer continues to report errors after being left to stand, you need to...Contact after-sales serviceReturn to factory for testing;
④?Six error beeps indicate the lid is not closed.
Cause analysis: The top cover is not properly closed or the shaft detection switch is malfunctioning.
A) Check if the lid is in good condition.
B) If the axis detection switch has fallen or malfunctions, it needs to be checked.Contact after-sales serviceReturn to factory for testing;
⑤?Error message 7: Label error.
Portable printer LED?The corresponding error will be displayed.
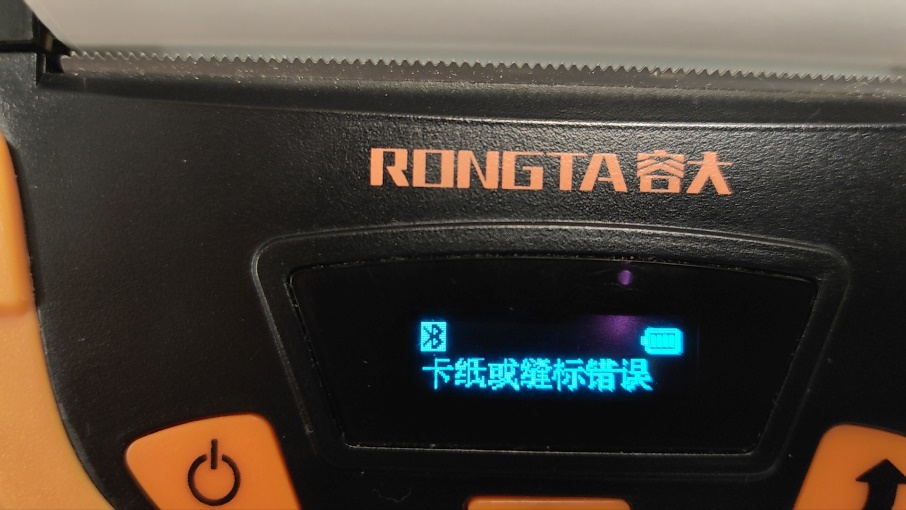
Cause analysis: Label recognition error
Solution:
A) Check if the paper is installed correctly.
B) ConductLearning without paper
C) If none of these solutions work, the optocoupler may be faulty and requires further investigation.Contact after-sales serviceReturn to factory for testing
⑥?Nine error beeps indicate an SDRAM check error.
Cause analysis: The motherboard has a problem with poor soldering or a short circuit;
Solution:
connectRongda After-sales Servicerepair;
⑦?Error message: 10 beeps, Flash check error.
Cause analysis: The motherboard has a problem with poor soldering or a short circuit;
Solution:
connectRongda After-sales Servicerepair;
6. Barcode cannot be scanned.
①?The barcode appears jagged when the customer's image is printed.
Solution:
By adjusting the printerHalftoneAdjust the halftone to none
②?Vertical barcodes are too dense to scan.
Solution:
A)Adjust print density using tools;
B)Drive to adjust print density;
③?The barcode is too narrow to be scanned.
Solution:
The customer adjusted the printing template, widening the barcode width;
7. The driver is not printing orders.
①?Check if the print command is correct.
A) Confirm that the command mode on the self-test page is in tab mode;
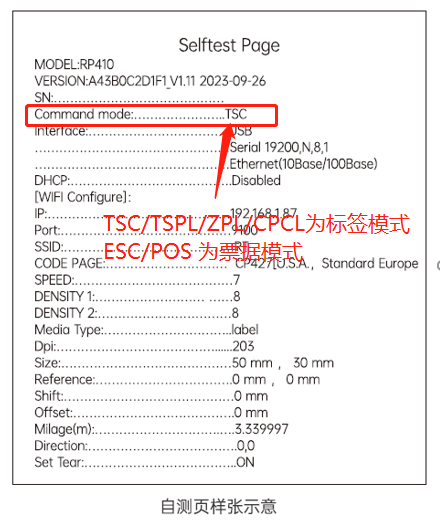
B) Check if the driver name is correct; the driver suffix must match the tag type on the self-test page.
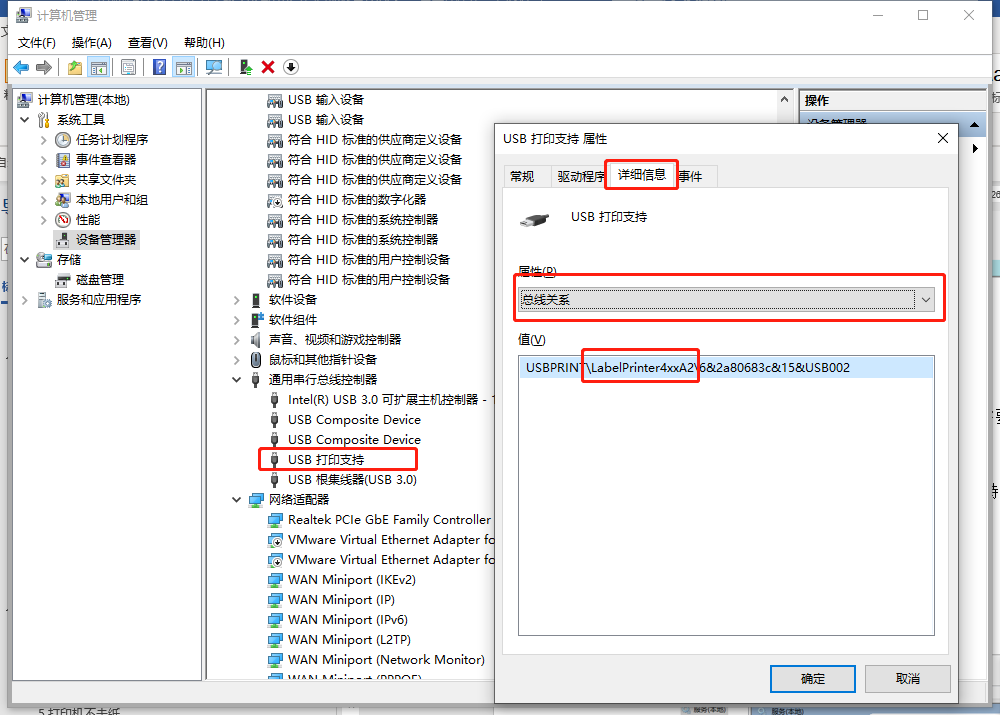
②?USBWhen printing, check if the driver port is configured correctly.
When using a printer, there may be a situation where multiple virtual USB print ports are displayed on the driver port. In this case, you need to select the correct USB port to print normally.
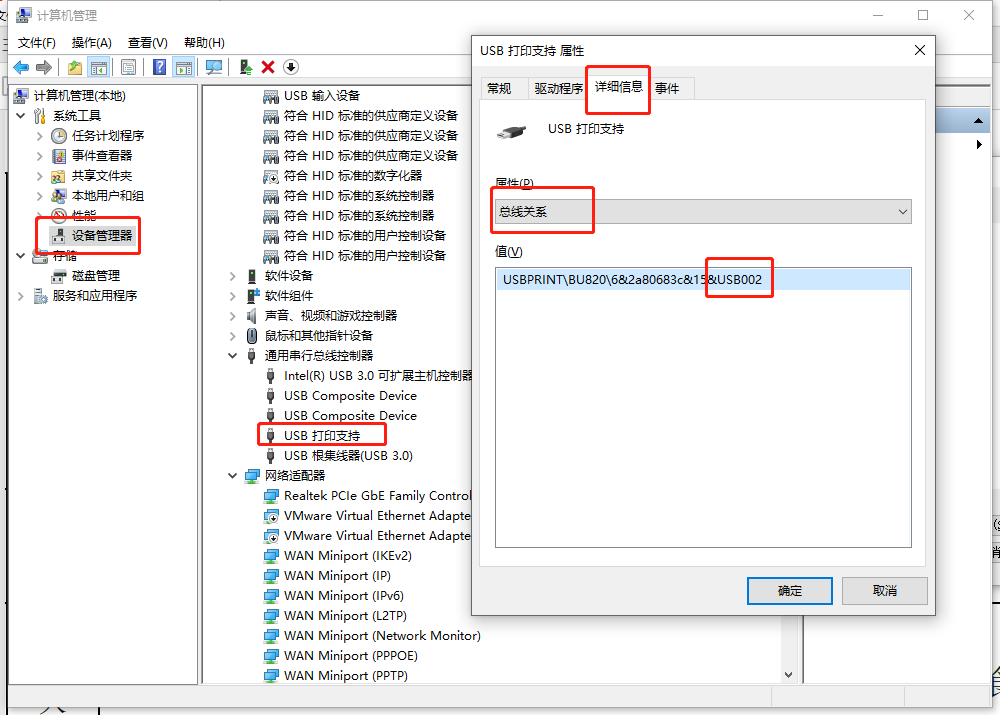
A) Check the printer's USB port number;
- Open My Computer — Right-click — Manage
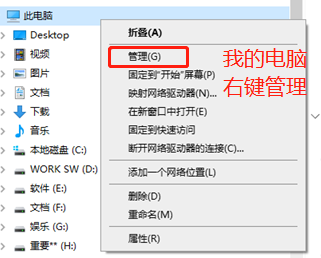
- In Device Manager, navigate to Universal Serial Ports, find "USB Printing Support," select Properties, choose Details, scroll down to find Bus Relationships, and confirm the last string of characters in the value, which is the USB port number.
B) Configure the driver with the correct USB port number;
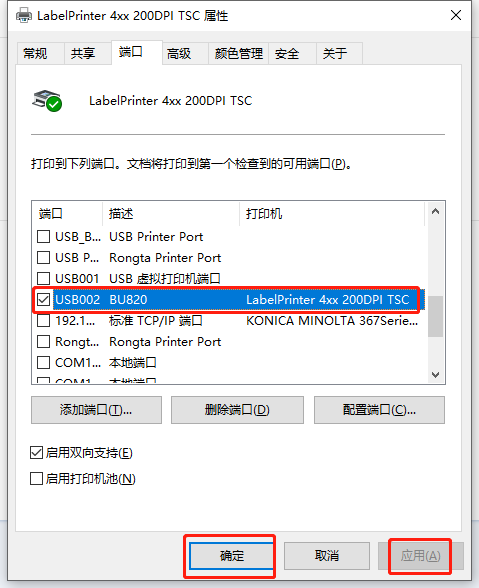
C) Print the driver test page to confirm if it works correctly;
③?When printing from the network port, check the network environment and IP configuration.
A) Confirm that the printer and the computer host are on the same local area network.
B) Check if the printer's IP address is on the same gateway as the computer.
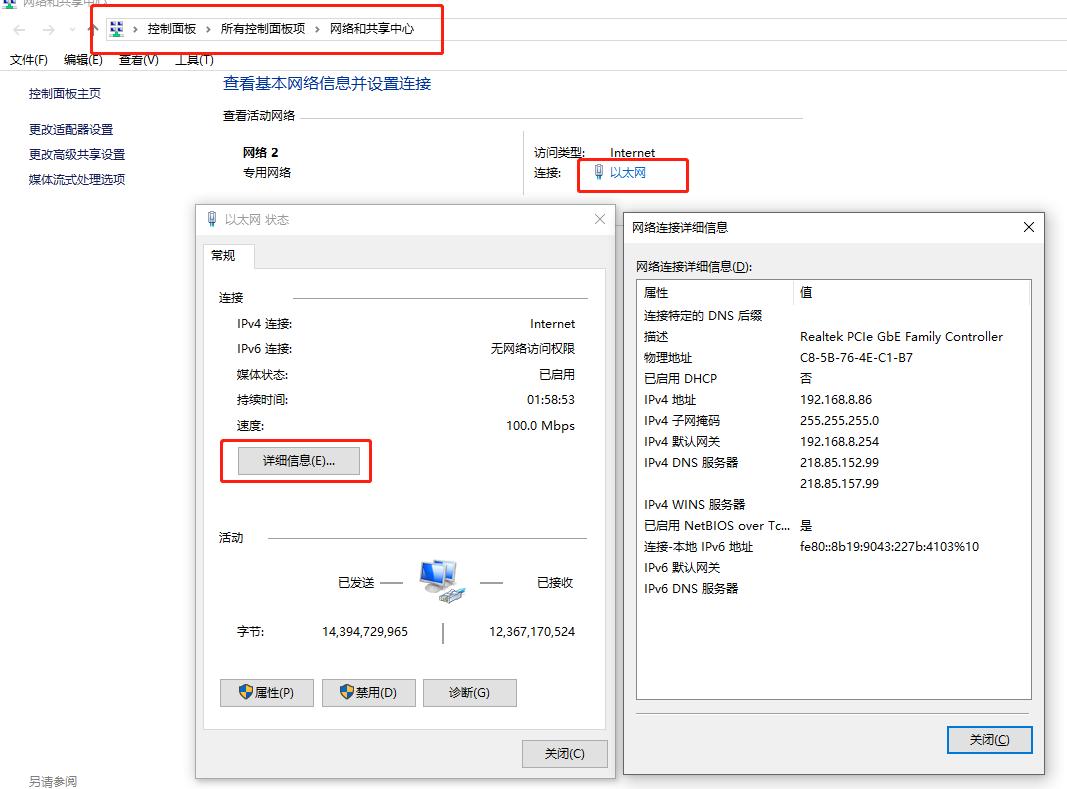
The printer's IP address can be determined from the IP address on the self-test page. The computer's IP address can be viewed in Control Panel > All Control Panel Items > Network and Sharing Center, by selecting the corresponding network adapter and then > View Details.
C) If the computer's IP address and the printer's IP address are not on the same gateway...Tool to change printer IP
D) Then print a test page to confirm if it prints correctly.
8. The printer cannot be turned on.
①?Check if the power is connected.
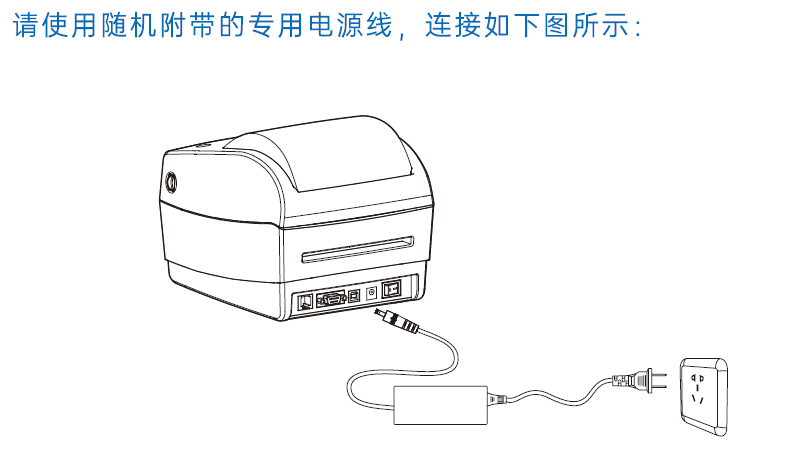
②?Check if the adapter indicator light is working;
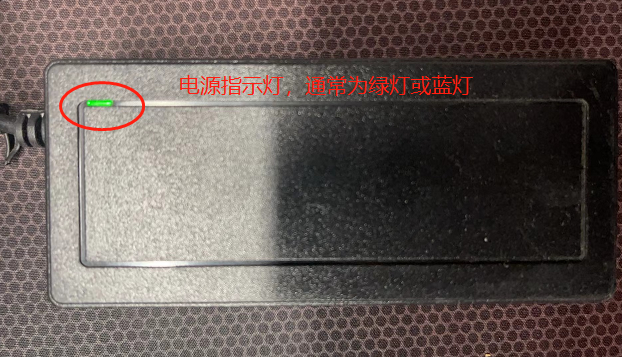
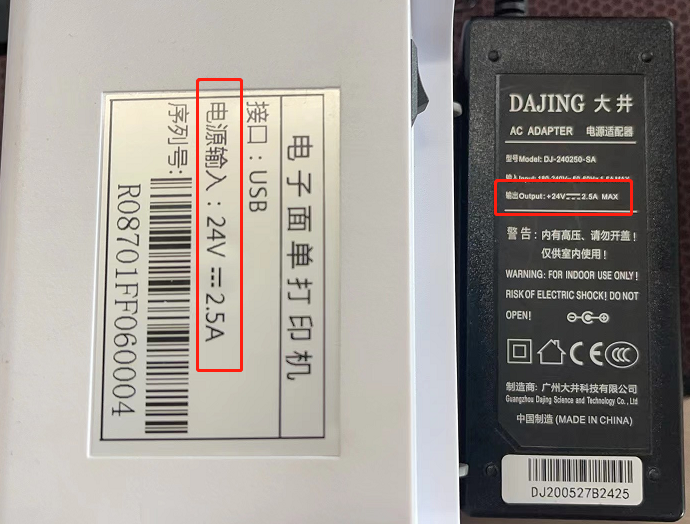
③?Check if the printer adapter specifications are compatible with the printer.
Check the power input specifications on the bottom label of the printer and the DC output specifications on the back of the adapter.
④?Check if the printer light is on;
⑤?connectRongdaAfter-sales serviceReport a repair
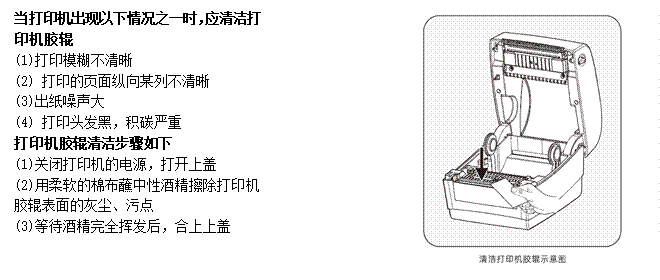
III. Daily cleaning and maintenance:
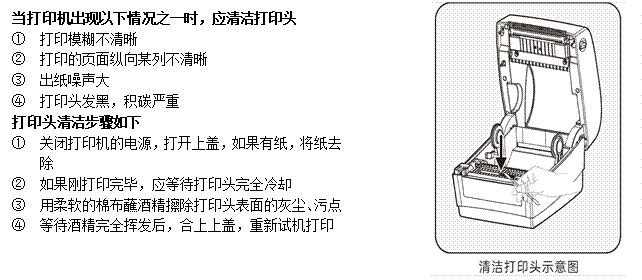
1. Printer head cleaning and maintenance
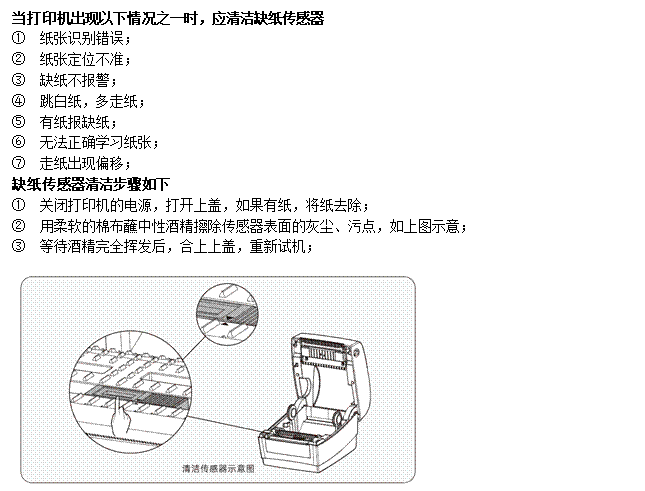
2. Clean the sensor
3. Clean the printer's roller assembly.
IV. After-sales contact information:
①?400Technical services:
Hotline: 400-800-0596. After dialing 400, press dial 2 for label printer service support.
Working hours: 9:00 AM - 8:30 PM (6:00 PM on weekends/holidays)
②?After-sales repair methods:
Recipient: After-sales Service Department?receive?Telephone: 15359340780
Address: Rongda Science and Technology Park, No. 88 Tonghui South Road, Tongan Industrial Concentration Zone, Xiamen City, Fujian Province
Return Repair Instructions: When returning the device for repair, please include the return address, contact information, a list of all items packed in the box, and a detailed description of the malfunction in the package. This will help improve the efficiency of the return process. Thank you for your support! If no information is provided, the device will be returned according to the sender's information.